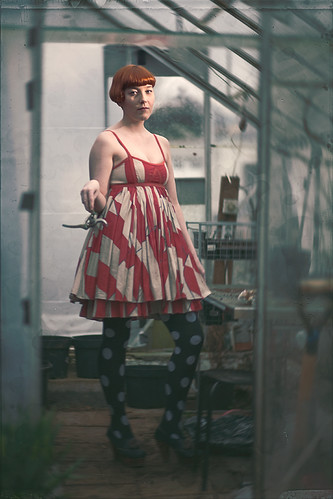
Settings: Ambient read at f/1.4, and the flash aimed at just her face was at f/1.8
A quick one from this afternoon. My friend Lilja has bright red hair, and always has the coolest outfits on her facebook photos. I saw the polka dot tights and knew I had an image somehow. We were originally going to go into the woods for the shoot, but it started to look like rain. A friend had a greenhouse, and it quickly went from a proposed plan B to the best idea.
I had seen a magazine on the racks here in Iceland with what looked like a tintype image, and I was inspired at the color of the processing, and the faded colors of the image. I knew her bright red hair and the dress we had picked out would survive this processing, and would probably be made stronger because of it.
For setup, I put my black 1x2 meter frame just outside of camera left. This is serving to darken the shadows on that side. The greenhouse was glass on all sides, and it was an overcast day, there was almost no contrast or shadows inside the structure. The black board introduced a bit of contrast, but to properly expose her face, I had to totally blow out the background, which I did not want. I wanted the softest setting of my lens with the shallowest depth of field, so I locked it to f/1.8. At iso 100 and shutter speed of 1/125, this gave me f/2 where her face would be, too bright for what I wanted. Knowing that I was using the light tightly gridded to her face, I could go way above the sync speed.* I bumped the shutter to 1/250, taking the ambient to f/1.4.
Next I put the quadra on a boom, using the grid reflector with a 20 degree grid. This gave me a very tight beam of light, tighter and harsher than my softbox. I wanted to contrast the soft light of the rest of the image, and I knew I was going to use some softening post processing techniques, so the harder lighting would help the face still read when I was done. It was drizzling the entire time, which made me so glad I was using the quadra system, which is largely weather sealed. I put the cable in plug B, and lowered it to the lowest setting of 8.2. This gave me a reading inside the greenhouse where her face would be, of f/1.8, right where I wanted it.
Because of the light meter usage and the tripod to find my exact camera angle, once the model came out it was very fast. I directed her pose, (as an aside, I cleared the view of all modern day looking things like plastic bags of dirt and colored buckets, always control your scene), had her tilt her head in the direction I wanted, and fired a test. I could see the light was not far enough around to give me narrow lighting, it was more like a rim light, so I moved the boom to be closer toward me, and it hit both eyes for the look I wanted. We were done with the actual shooting bit within 10 minutes.
For post processing, I new I wanted to absolutely destroy the corners. First I used a lens blur set fairly low, and masked her out roughly. The items within the greenhouse were too contrasty and pulling focus from her, and this helped clear it up. Next I used a radial blur to really smear the corners the way a crappy lens does. I completely masked it away from her face though. Next I did a lot of color stuff. I made the shadows bluer, the highlights yellower. I made a blue/green layer that only went on the low shadow tones, but not the blacks. Then I made a desaturated green layer, set it to lighten, and only let it touch the deep blacks, effectively taking away the contrast of only the low end of the image, a typical look of antique photos. Finally I found a stain texture and a glass plate texture which I overlayed lightly to give it a bit of texture as if it were on paper. The whole goal was a contrast between a high quality center, with destroyed edges, and a desaturated fatigued look of the colors, with her hair and dress still shining through by virtue of their saturation.
*once you go above your maximum shutter speed (on the 5D it's 1/200, but with a skyport it's effectively 1/160 because of delay) you start to see the shutter blocking the flash on the image. however, that's only on the lower part of the frame, and it gets progressively higher in the frame the higher you go over the sync speed. If the area where the flash is hitting, is high in the frame, you can disregard the shutter creep shadow, because it's not evident anyway. In this image, her face is the only part getting flash, and it's "high" in the frame. I would have probably had to go to 1/320 to start to see the shutter creeping onto her face and blocking the flash.