Showing posts with label double strobe. Show all posts

Tuesday, June 21, 2011

red_heads_setup

Recently I took another shot for my red-heads series:

IMG_6602.jpg

and I managed to snap a wide angle shot of the lighting setup I wanted to share:

DSCF1905.jpg

On the far left, you can see one of the Quadras, this one was plugged into the B port, so it's pumping out half the light of the main, all the way in the upper right, which is shooting through the 1.5 meter Softlighter. The back light is directed through a white scrim on an aluminum frame. I have both scrims on it, one on each side, to soften as much as possible. This is providing the pure white background of the image. Then the Softlighter is from directly in front and above, at a 45 degree angle, providing the main light.

Monday, May 31, 2010

mexican_lights

mexico_self-1

Settings: Background is properly exposed, flash into 1.5 meter softlighter II to camera right, with the light meter at face level powered to expose properly.

Agust and I went to Puerto Vallarta, Mexico last month. I actually lugged all of my studio lights down there for a photoshoot that didn't really pan out, but I went in knowing that might be the case. I made sure to use them anyway. The above photo used just the 1.5 meter softlighter. One problem is that the outside and inside are such different light types, the outside being harsh sunlight, and me being lit softly, that it looks composited or cut out. The fact they are even in brightness and focus is also contributing. This was intentional, as I wanted the outside to be clear and well lit to show just how nice the hotel and our balcony view was. In addition, it was unavoidable without neutral density filters. to properly expose the outdoors while staying under my sync speed (1/160), I had to go to f/11. This means that foreground and background on a 35mm lens (what I used) would be sure to be both in focus, even with the extreme distance from subject to distant background. If I did want a blurry background, a neutral density filter over the lens would let me increase the aperture. This is also a reason I'm glad I have the power of the Quadra, as I needed about 3-4 hotshoe flashes worth of power to equalize subject and background.

One thing I could have done, and did do for a later shot, is add a rim light. By adding a hard rim light, it reads visually as the sun coming onto the subject, which unifies the lighting, making for a less composited look.

agust_mexico-3

Settings: Background is overexposed by half stop, flash into 1.5 meter softlighter II to camera right, with the light meter at face level powered to expose properly. 2nd flash through reflector with 20 degree grid behind subject to camera left, also properly exposed.

This blends much better with the outside exposure. The slight over exposure is what you expect from looking out a window, and the harder rim light feels like it could be the sun hitting the subject's head.

With both of us in the image, I wanted to use the window and blinds as framing elements, to show that it's on a balcony. This served as our vacation snap from the trip, and while I knew it would look partially cut out with both fore and background perfectly lit and in focus, I wanted both subjects to be prominent and clear. By using such a large source, I was able to keep it a little back and still get soft light, ensuring both of our heads would be the same exposure despite being different distances from the light. (the closer the source is, the more affect different distances from the light will have because of falloff. If the light was only 20cm away from the closer subject, 20cm between our heads would make 40 vs 20cm, for half the light, but with the light 2 meters away, it was 2 meters vs 2.2 meters, such a small difference as to be unnoticeable)

b&w-1.jpg

Post was minimal. Some contrast adjustments, and bumped both the blue and green colors so the sky and trees would pop a bit more.

Tuesday, May 25, 2010

red_heads_series

red-1

Settings: Main light through a 1.5 meter softlighter, and is metered to proper exposure at his face. 2nd light is behind a white diffusion panel, aimed into the camera, and meters also at proper exposure.

From the numerous shots of my husband, one might be able to ascertain my affinity for red-heads. I find the features fascinating, the trending toward pale skin, freckles, what the light colored eyebrow hairs do to the reading of a face, and the often green eyes. I just think red headed people are fascinating in their anatomy, skin tones, and differences from the rest of the pigment gamut. I decided to put my fetish toward a new photo series. One might think I'd start with my husband first, but I had an opportunity to shoot a stranger first, more shots will follow in this series.

The lighting goal was to keep the focus on the features. Soft, revealing light, and a pure white background so as not to distract from the features. I kept a slight falloff of focus to give it a sense of immediacy. An all in focus image would have been a bit too clinical. I used my 85mm lens to make sure there wasn't any distortion of the facial features, and a benefit is that at f/3.5 this lens is nearing it's ultimate sharpness, giving crystal clear sharpness to the details in focus.

To achieve this lighting, I used 2 lights, and to get a pure white background, I used a very convenient approach. The first light is in my giant 1.5 meter softlighter, directly over the camera and about even with the lens, placing camera and light about 1 meter from the subject, with the light raised above and aiming down. This provides soft even lighting with some volume from being raised. If it were even with the camera in height, the light would be more flat. Now the kicker, is the 2nd light. I have one of my 1x2 meter panels with diffusion material behind the subject about 1 meter, and the 2nd light is behind the panel aiming back through. This means rather than trying to evenly illuminate a white paper backdrop, I'm lighting up a diffusion panel from behind. This is similar to the lastolite popup white background, but works with my existing equipment. By keeping it a bit behind, I avoided flare. If you pump too much light off or through your white background, you can create a contrast reducing flare. I used the B head from my quadra, so it's half the output of the main light, but since the diffusion panel eats up less lighting than the softlighter, they are even in light output. This results in a proper illumination of the face, and since the diffusion panel is white, proper illumination of it ends up with solid white background.

Post processing was mainly to remove a few tiny blemishes, and really enhance the contrast. I wanted to avoid an over baked look, but really get some details popping. This resulted in a lot of back and forth between curves, and then fine tuning the saturation sliders to make sure the shadows didn't go too burnt in redness. I toggled between color and black and white a lot to make sure I got the full range of contrast, this is more evident in B&W, so by changing over to that you can see how your value range is, then switch back to color to make sure the saturation levels work with your adjustments. The other really important thing is White Balance. Skin tones and hair color is really important for this series, so I had to be absolutely sure of color neutrality. One thing I love about my Quadra is it's color consistency at all power levels, but working on a color calibrated monitor was pivotal to making sure it was perfect.

Sunday, April 4, 2010

smooth_rim_light

b&w-1.jpg

Settings: Face light is proper exposure, right rim is one stop above, left is about a half stop above.

I attend a Kettlebell class at a gym called Mjolnir (the name of Thor's hammer in norse mythology). The gym really loves having masculine aggressive imagery up, but I noticed that all of it was from foreign athletes, despite numerous staff members, as well as attendants, being just as muscular and photo worthy. I love Iceland, and any chance I can get to promote internal imagery rather than importing stuff made elsewhere, I try to encourage it. I decided to pursue a shoot with them, and do a test shoot before hand so that they would need to do very little imagination to see how it would come out.

b&w-5.jpg

Settings: Face light is proper exposure, right rim is one stop above, left is about a half stop above.

I knew I wanted rim light for the revealing effect it has on muscles, but I also wanted to light the face. Before going into the lighting, here is the setup shot. Click through to flickr to read the notes.

b&w-3.jpg

The main light is my standard 30x40 XXS softbox with a 20 degree grid to keep it just on the face. This is reading f/4 with the light meter, and my aperture is f/4. So the face is going to be properly exposed. The 2nd light is off to the side, it's shooting through the white diffusion panel, but also past it (you can see the edge on the floor where the light is spilling) and bouncing off the reflector. The rim is reading f/5.6 on the right side (for one stop over) and f/4.5 on the right for a slight over exposure. I would love to keep them even, but the light has further to go when bouncing off the reflector, and loses some light because of the inverse square law (double the distance, quarter the intensity). If I had a longer cable, I could bring the light way further back, to keep the distances more similar, but the cables were already at their limit. Having a light meter really helped a lot to be able to ensure proper exposure, and making sure my rim lights were coming out brighter than the main, and by how much.

b&w-2.jpg

For this one I sprayed him with a water spritzer to get a sweaty look going.

For the actual shoot, I am going to run both lights through diffusers to get even, smooth rim on both sides. To keep from getting skunk lighting on the face (a dark black line down the center) I will just put a silver reflector disc on a boom arm for some slight fill. I much prefer the rim look, and lighting the face too evenly removes the constrasty affect from the muscles. I'll post them when they're done.

Tuesday, January 5, 2010

second_light

new_years_2009-4

Settings: Ambient is gone, main is from the small softbox with grid on camera right, 1.5 stops above neutral grey, and fill is from a large 110cm silver umbrella almost directly behind the camera even with neutral grey.

For Christmas my husband (that's him above) got me a 2nd S-head for my Quadra. I can now use 2 lights again. It was freeing having only one for a while, and I imagine I'll still use just one for a lot of photos, but now I can bring in two when I need it.

This was a quick test with using it, as well as a long term series I want to do. A mugshot of each of us every year at New Years (our engagement anniversary). I got the idea from another family that did this from the 70s through the 2000s, including when they added their kids in. I forget where I got it from, but you can see the sequence here: http://www.poopinmymouth.com/wip/age_family.gif I have a long way to go to get that far, but it's good to have some extremely long term projects.

new_years_2009-9

Settings: Ambient is gone, main is from the small softbox with grid on camera right, 1.5 stops above neutral grey, and fill is from a large 110cm silver umbrella almost directly behind the camera even with neutral grey.

If you look closely in the eyes of the large version, you can see the placement and relative brightness of the two mods. The umbrella is the dimmer fuzzy one in the center, and the softbox is the square in the upper right of the eye.

I've been studying Dan Winter's work, and I love how he controls the shadow density with a ringlight. I'm not a fan of actual ring lights, but the principle of using an on axis fill (something strobist fans will be familiar with) is really appealing. Right now the Quadra can only do a 2:1 ratio, so I can only play with distance, but I plan to build some mesh covers that give me 4:1 and 8:1, as well as letting me drop a single head even lower than the current minimum of 8.2 watts. By placing the umbrella directly behind the camera as a fill, every surface you can see gets light. This way you can keep your shadows from going black. If you move it off to the side, you run the risk of creating pockets of shadows which normally looks awful. Fill goes on axis, or as close as you can get without coming into view of the camera.

One thing I really like about this, is that I still have my super contrasty main light, my small softbox with grid, but I can keep the shadows under control even in an indoor environment. Most of the time I use ambient as my fill when doing outdoor stuff, but now I can bring it in even indoors easily.

Wednesday, December 23, 2009

pepe_portrait

pepe-1

Settings: Ambient was completely underexposed, 3 stops or more. Large white softbox from camera left at neutral grey, and small gridded softbox from above and to camera right at +1.5 stops over neutral grey.

This one was a little different than most of my stuff, being that it was a real studio shoot rather than a location based outdoor shoot. I was inspired by a real life lighting situation. I was riding the train, and sitting in one of the small glass booth partitions. It had a glass back wall behind my head, which let in the bright soft light from the main car to provide a dim fill, and a spotlight embedded in the ceiling lit up my forehead and cheekbones while leaving my eye sockets relatively dark. The reflection on the window behind me gave a brighter background to show the silhouette of my face. I knew I wanted to use this lighting setup, but it would require more equipment than I have.

Luckily a coworker allowed me to borrow his grey seamless background, a hensel studio flash and giant 1x1.2 meter softbox. First step was to setup the seamless, fairly easy, just two stands, a cross bar and a roll of paper. I have to get me one of these. Next was his softbox. I kept the power as low as it could go, because it was a 1,000 watt unit compared to my 400 watt running the small softbox. The large one was to keep anything from going black, to illuminate the background, and cast a nice soft shadow onto the background, anchoring the subject.

I set my camera to iso 100, 1/125 and f/5.6 to get sharpness and enough depth of field. I was using an 85mm lens to get rid of any distortion from being a full body shot, and to make sure I only got grey seamless background. (longer lenses compress the background, shorter lenses show more, subject size staying the same) The background was featureless so there was no room to isolate or try to over increase dof. The softbox had to be boosted just a tad to get the right lighting on the face. Most of this initial time was spent with my friend acting as assistant (more on this later). I had to move the softbox forward, closer to the camera axis to get the light to fall correctly and fill both eye sockets. I also kept it about 3 meters back to evenly light him and the background without too much severe light falloff. The dark color of his suit, and the lightish grey of the background paper is what gives the nice silhouette outline. The softbox adds just a bit of volume to the suit, but it's too low to brighten it fully. The grey paper background reflects a lot more, giving a good tonal change. The soft shadow on the background paper is from the large softbox.

Once the fill softbox was dialed in, I added my small 30x40cm softbox with 20 degree grid to a boom, directly in front of the subjects face, about 2/3 of a meter above the head. I wanted the light to hit his face, but only on the forehead, and cheek ledges, not fill in his eyes. This would give me several things key to the look: Deep eye sockets, falloff from head to toes bringing attention to the face, soft edged shadows from the apparent size of the softbox being so close to the face. Without the giant fill softbox, the eyes would have gone way too dark, and had no catchlight, making a much more sinister look. The bright area around his feet are from the beam of this overhead softbox.

I really like how clean the final result came out without looking too soft or safe. It has some edge and contrast to it, with a clear focus point of his face, and nothing important getting lost.

Monday, April 27, 2009

hugo_boss

hugo_boss-2

Settings: Ambient is at -3 stops below neutral grey. One flash into a large silver umbrella off frame left at +1 stop above neutral grey. One flash with a gridspot aimed just at the face, outside frame left and slightly behind the subject at +2 stops.

Nothing like a new outfit to inspire a portrait session. Here's the setup shot:

hugo_boss-1

Really simple, but the one little twist is the head only rim light. This pulls focus to the face, which is important in a composition like this, where nothing falls on a natural point of power. Without the gridspot, it would have rim lit the whole portrait, which would have been too contrasty and harsh.

This is also a powerful lighting setup that allows for a lot of model movement. Here is a front facing pose with the same lighting.

hugo_boss-3

The only thing I'd like to change, is that the rim is just a bit too harsh. An 8" reflector with a honeycomb grid would have been perfect. It would have had a smoother falloff into the soft area of the face, rather than the hard edge it has now. The subtlety would have enhanced the lighting on the face.

Having the background quite far behind the subject allowed me to use an aperture of 6.3 for razor sharpness and a fully focused figure, with a slightly blurry background to make sure the focus fell completely on the figure. The far away background also allowed it to fall into a very dark grey. The light sources are so close to the subject, by the time they reached the background, they are much dimmer, giving a natural lighting ratio.

Post was very simple. I used a gradient map layer, with neutral grey as the light and dark area, but with a greenish blue transition area, and a purple blue shadow area. This way I could tone the transition from light to dark with a slight blue, and then the very start of the shadows are purple. The gradient map layer was then put to overlay mode. For more info on gradient maps, use this tutorial. (from my 3d site) Then I made a solid color layer, a very light cream color, put it on screen mode, and then backed it off to 5%. This makes everything a bit smoother and less digital feeling. I then used my standard sharpening procedure, masking out areas that looked too harsh.

Tuesday, February 17, 2009

Óðinn part 2

odinn_boxer-2

Settings: Ambient is 4 stops below neutral grey. One flash behind the model and aimed forward at 4 stops above neutral grey.

After the shoot out in the snow, we warmed up in the car and went back to the subject's flat to take some interior portraits. I used the 1x1.2 meter black/white backdrop I've spoke of before to get the pure black background. I set up a front flash into a silver umbrella for the front fill, and a back flash for the rim light. However the front flash was at full power, which takes 5 seconds to recharge, and I tried to take a photo before it had finished, and I got the first shot of this post, which ended up being my favorite. The flash is bouncing off his skin and hands to fill what little of his face you can see. The rest falls off into black.

When the main flash actually fired, it looks like this:

odinn_boxer-1

Settings: Ambient is 4 stops below neutral grey. One flash behind the model and aimed forward at 4 stops above neutral grey. One flash in front into a large silver umbrella, at 2 stops above neutral grey.

It was a very easy setup to throw together, and it turned his living room into a studio as long as I kept the framing tight. Any stray edges of room that peaked in were easily blacked out with a paint brush in photoshop.

I will definitely try to play more with the look of the original shot, aiming for it to be my actual lighting setup. The main problem I have with it, is that it's so blown out. I'd prefer to use a larger light source, maybe a large or small silver umbrella, and keep it from blowing out so intensely.

Wednesday, January 28, 2009

Fiona Evening part 2

fiona-9

Settings: Ambient was between 1-2 stops below neutral grey. The far background was 2 stops below, and the foreground was 1 stop below. Flash one is even with the photographer and aimed at the large white wall just outside camera right, turning it into a giant softbox. Flash one is about 2 stops above neutral grey. Flash two is off frame left, about 4 meters behind and to the left of subject, about 2.5 stops above neutral grey.

Next stop was a large church building on a hill overlooking the city lights. Here is the research shot I did.

fiona_research-5

I liked the rock, and originally I wanted to include the white wall and bench as well, but after I cropped tighter, I liked it much more with just the rock. First I got a good exposure with just the ambient, then I added the first flash and aimed it at the wall. This provided a beautifully big soft light for her front. Then I added a second flash to the left and behind. This one I zoomed to 105mm and aimed upwards so that just the feathered edge touched her. This prevented it from hitting the rock, for when I was taking wider crops earlier. This also made that flash weaker than it's lowest setting of 1/128.

Fiona was a natural, I barely had to direct her at all, she's just a glam-rocker and knew how to make love to the camera. The outfit was her choice too, but the red on black work so well in this dark city scape setting.

One more from this setup.

fiona-10

Monday, January 26, 2009

Fiona Evening part 1

fiona-3

Settings: Ambient is 1 stops below neutral grey. Flash one is just to the right of the photographer aimed at the ground, at 1 stops above neutral grey. Flash 2 is off frame left, and even with model, zoomed to 105mm and 1.5 stops above neutral grey.


I had a really nice 3 hour shoot this past weekend. Fiona is a friend of mine, and very beautiful, with a great sense of fashion, so it made sense to ask her out on a shoot. I've had the feeling I've been over-lighting a lot of my portraits when I go out to do location stuff, so I wanted to try to be a bit more subtle. This was a project to work on that. It was also my first shoot out with my new (used) 5D body. I love working with full frame.

I had some vague ideas in mind, and locations, but I needed to figure out more on what I wanted before dragging her and my lights out for the real thing. I did a research trip, which greatly helped. I visited the locations with just my camera and lenses the night before, and figured out angles and composition. After getting home, I was able to also think about final lighting.

Here is the research trip image:

fiona_research-1

For this setting, I knew I wanted to have her sit on the chain in the right side. It would work well compositionally, plus it would put her against a dark portion of the image. By then lighting her, it would really help her pop out from the background. I wanted to use the lamp post as a mental "light source" Meaning my brightest light would come from it's general direction, so as to imply it being the light source. My second light source would act as a fill from the right side, and be much softer and a stop less in intensity.

fiona-2

The flash from the left worked perfectly as a bright light source, but it left some harsh shadows on her face. I needed a soft, dimmer light source from the right to fill it in. I would have liked to use an umbrellas, but it was quite windy and I had no assistant to hold the stand. I ended up setting the flash to about 1.5 meters height, zoomed it to 50mm, powered it up a bit and aimed it at the ice in front of her. It worked great as a large soft fill. I ended up having to darken the ice below her feet in post, to hide the light source and keep attention on her face, but it was a really nice result.

One quick note on the main flash. It was zoomed to 105mm, but I aimed it upwards so that the feathered edge of the beam hit her around the waist height. If it had been aimed directly at her, there would have been harsh shadows leading away from her legs. I used that extensively on this shoot, using just the feathered edge to touch her head, but fade out before the lower body.

Two more after an outfit change. Same lighting setup.

fiona-5

fiona-4

Tuesday, November 25, 2008

Belly Dancers part 2

bellydancers-10

Settings: Ambient is 4 stops below neutral grey. One flash into 110cm umbrella, 2 stops above neutral grey, on the right, and one flash into 61cm umbrella, at 1 stops above neutral grey, on the left. Both flashes were set to maximum height of about 2 meters, and angled at 45 degrees to the group.

These are from the same shoot as the last post. This dance group needed promotional shots for an upcoming show and asked me to help. Luckily they had a black seamless paper roll set into their ceiling, which made for a nice backdrop. Despite the sun streaming through the blinds, by using 1/250 and ISO 100, I was able to completely kill the ambient for some nice contrasty shadows. I asked the ladies to stand as far away from the background as possible, so that the shadows would be as unnoticeable as possible.

bellydancers-3

By putting the two lights at 45 degree angles, and at the maximum stand height, I could be sure that everyone would receive lighting, and there would not be too much shadowing to obscure details. This way I could focus on the ladies expressing themselves with the different dance poses, and not have to worry about them moving outside of the lighting area. I made sure to do the group shots first. It was the main reason for the shoot, so I wanted to make sure I had it in the bag, before people's energy wore off, or possible equipment failure.

bellydancers-1

Next I wanted to shoot individual portraits against the black seamless. The seamless was at a 45 degree angle to the camera and the subject. This ensured it went to full black, since less light was received by it. I also had a smoke machine outside frame left, which I turned on briefly before each shot, in order to add some interest to the floor level, rather than leave it plain.

bellydancers-4

Settings: Ambient is 4 stops below neutral grey. One flash into 61cm umbrella at 2 stops above neutral grey, to the left and at maximum stand height, facing down. Second flash is through gridspot, at 3 stops above neutral grey, to the right, aimed at just the head and shoulders.


This time, with only one subject, I had more freedom with lighting. I placed the 61cm umbrella to the left, aiming down. This would ensure the face and upper body was fully lit, but the lighting would fade out toward the floor, creating a natural focal point. I put my gridspot on the 2nd flash, and put it behind the subject, and to the right. I used the modeling light to ensure it was only hitting the head, and was gone by about the waist level. This gave me a bit of separation against the black background, ensuring the silhouette is clearly visible.

bellydancers-5

I wanted the dancers to look a bit regal, so I was crouched on the floor, to have a bit of an upwards facing angle. In post, I used a curves layer to make the smoke extremely punchy, and the background go extremely dark. I made a quick mask to keep it off the subject, and blurred it to fade smoothly. I used an inverted version of this mask, to warm the subject slightly. This color contrast also gives it a bit of pop between subject and background.

The shoot was quick and fun, and the girls had a great attitude about it. The fact there was no one there but myself, one other photographer who assisted me, helped keep them at ease, which enabled great posing and expressions. Too many extras might have introduced some self consciousness and stiffness. I was glad I did a bit of pre-visualization before heading out, as I was able to work much faster after getting there and setting up.

Sunday, November 16, 2008

Covered Garage

chantal_concrete-1

Settings: Ambient is 1 stop below neutral grey (other than the lighting fixture itself, which is 3 stops above) Main flash is into a 61cm umbrella at 1.5 stops above neutral grey. Secondary flash is aimed at the wall behind the circular opening, and is about .5 stops above neutral grey.

Several weeks ago, I passed a really interesting covered parking garage here in Reykjavik. I knew instantly that I wanted to use it as a backdrop for a photoshoot. The concrete and the long lights provided so much interest, and would contrast really well with a subject. In my mind, I wanted to do a full body portrait with a lot of the garage showing, but those shots didn't turn out so well. It was all the impromptu posings and backgrounds that worked best.

This was actually the final area/pose of the evening, and I think it worked best of all. I saw the circular opening, and knew I wanted to use it as a framing element. I asked her to stand inside it and put her arms out. The first several poses had good compositionl, but the way the light fell on her face wasn't very flattering. I took some time to examine the back of the screen, and asked her to move her head a bit forward so that more flash would reach it. This is one of those times where sticking to the shoot and asking for more, to ensure you get the right shot.
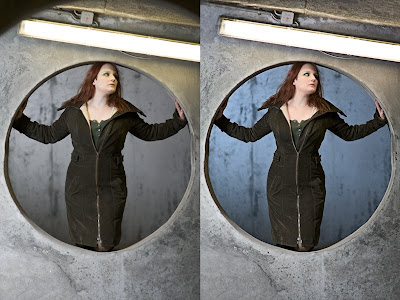


The post processing was actually quite involving, but because I felt there was so much potential to be had. Lately I've been shooting all my flashes ungelled, and color correcting in post, because I ended up doing that anyway to get the right colors, and this way I save time from having to bother with the gels. The first thing I did was to clone out the other circle in the top. It sucks because had I noticed it at the time, I could have reshot crouched just a bit lower, and it would have been gone. Once I had a clean plate, I used the liquify tool to slenderize her arms and waist a bit. The coat was extremely thick and killed her curves. Next I used the magic lasso tool to make a quick mask for the background, and used the cooling photo filter in photoshop. Then I made a custom white balance layer to subract the yucky green color from the flourescent lamp. I had to custom paint that mask onto her face and the concrete in order to remove it correctly. I liked the lamp a lot for what it adds to the composition, but the disgusting green had to go. Finally I used a slight warming filter on her skin to give it just a bit of warmth. Once the photo was where I wanted it, I used my typical high pass and smart sharpen combo to add some more micro contrast, but masked it away from everything in the face, other than the eyes, and edges of the nose. Female skin works well soft, so I left it that way, but eyes tend to look good with some sharpness.

chantal_concrete-2

Settings: Ambient is 2 stops below neutral grey. Main flash is into a 61cm umbrella at 1.5 stops above neutral grey.

This one is the result of a technique I've been trying lately with models. I asked her if there was any pose she was interested in trying, or thought would look good. She suggested having her hand by her mouth, and it worked out great. It took a few times of arranging the light till I was happy with how it fell, but I really like the final.
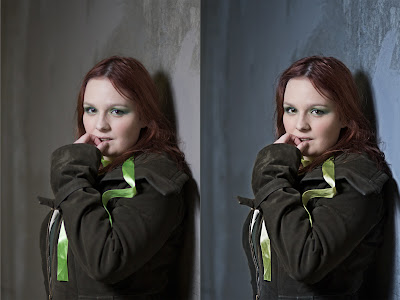


For the post on this image, I cooled the background, reduced the neon green of her ribbon, and tucked in the front of the jacket, and jacket sleeve. The shadow from her back made her look unnaturally wide, so I used an exposure layer to bring up the edge of the jacket and sleeve a bit, as if there was bounce light from the wall. I also fluffed up her hair a bit using the liquify tool.

chantal_concrete-4

Settings: Ambient is 1.5 stops below neutral grey. Main flash is into a 61cm umbrella at 1.5 stops above neutral grey to the right and in front of the subject, above head height. Secondary flash is zoomed to 105mm and through a gridspot, aimed at her head so that it only hits her hair. The secondary flash is about 2 stops above neutral grey.

This one is closest to my original mind's eye image of the shoot. I used a classic female pose, found on a 70's tutorial somewhere, and it helped, as originally she wasn't 100% sure of what pose to assume. We tried several, but I think this one was the most feminine and confident looking.
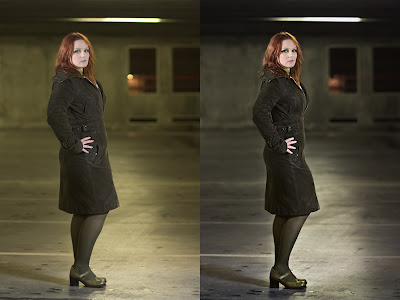


This one took the most time in post. Immediately I used liquify to remove the effects of the thick coat. During the shoot I asked if it was possible for her to angle her arm back in such a way that I could see a triangle of the wall between her elbow and the small of her back, as that's a very feminine aspect of the body. It was too constricting of a coat, and too uncomfortable of a position, so I added that part in photoshop. I cloned a bit of wall in to look like you're seeing through, then darkened the coat to make it look as if it really ended there.

Next I adjusted white balance on everything, neutralizing the green of the ceiling lights, and warming her face just a bit. I used a curves layer to add a lot more contrast to the background, and then used a technique from the Platon copy that I did. I used the mask of her figure to create an exposure layer, that darkens the image in a halo around her. It's only by about .4 stops, but it emphasizes her silhouette more and brings attention to her as the subject, allowing the background to fade away.

It was a great shoot, and many thanks to Chantal for being a lovely, willing model, and to Árnór who assisted.

chantal_concrete-3

Thursday, November 13, 2008

Pushup self-portrait

pushup-1

I was watching the movie, "Never Back Down" which was a bit cheesy, but fun. They did a section where they filmed the main character doing pushups, but did it with the camera oriented on it's side, then righted the footage so that the character looked as if he was pushing off a wall instead of the floor. I thought it would be a cool opportunity for a photograph, so when the movie was over, I set about emulating it.

First, I knew I wanted to use something soft-ish for the main light, but I wanted to create as much volume as possible, this was a good opportunity for my new 61cm umbrella. My main umbrella is 110cm, which would have made a much softer light, which would not have defined the muscles as well. 61cm is a great in between a bare flash and a huge umbrella when you want strong details that still have a soft edge. I had to move it toward the camera a few times until it revealed just the right amount of detail. I wanted a rim light that still raked across the muscles on the front. It's still slightly behind the subject, aiming a bit forward.

After the main was set, I started with the second flash. I tried at first to place it directly behind the head, and use as a bright rim light all around the head. It wasn't quite strong enough though, and didn't really give the effect that I wanted. I moved it off of the light stand, and attached it to the small stand the flash came with. It was about even with the main flash, and aimed up at the subject's head. However it spilled onto the arms, making them far too bright. After attaching a gridspot, I was able to keep it only on the face/torso and not on the arms.

pushup-2

Settings: Ambient is 5 stops underexposed. Main flash is into a 61cm silver umbrella at one stop above neutral grey. Secondary flash is at 1.5 stops above neutral grey, and is using a gridspot to keep it only on the face/torso and not on the arms.

After rotating the image to achieve the original planned look, I was quite happy with the result. The background did not go quite dark enough, as you can see from the setup shot. A quick pass with the burn tool gave me a true black background, which I think adds to and heightens the mood of the shot.

Monday, November 3, 2008

Andres Portraits

andres-1

Settings: Ambient is 2 stops underexposed, Right light is into a silver umbrella at 1 stop above neutral grey, and left light is a bare flash zoomed to 105mm and aimed at his head, at 1.5 stops above neutral grey.

This was a shoot that I´d been planning for several weeks and I only finally had time this past weekend. I´d originally planned to reuse the fishtank setting, which is why I asked the model to wear all white, but the office was extremely busy so we improvised. This is a nice park near the model´s house, and it offered some really interesting settings. It was cold and we needed to work fast. Luckily I had an assistant to hold my lightstand so I could use an umbrella. The lighting setup was very simple, the main flash was into a silver umbrella for a nice even and soft light, and the rim light was a bare flash zoomed to 105mm so that only his head and shoulders would get rim lighting and I wouldn´t get a 2nd ugly shadow on the ground. As we moved from setting to setting, we only had these two, very light, light stands to move around, and it enabled me to quickly get all the shots I wanted. As the ambient level dropped, I was able to just open the shutter more to compensate.

andres-5

Because his skin is a bit darker, I needed to make a bit brighter exposure, but this risked blowing out the bright white clothing. Luckily my 40D has quite a bit of raw headroom to bring the highlights down, so it worked quite well. I just used a little bit of the recovery slider in lightroom to bring the clothing down, while leaving his face well exposed. The white clothes help to contrast with his darker skin tones, to bring more attention to the focal point (his face).

andres-6

For this one, because I couldn't physically put the rim light behind him (we were on the edge of the dam, so only open water was behind this railing) I put the second light against the railing, and it provided a bit of fill, giving an almost glowing affect to his face that I like very much. It manages to not quite overlap the main light, so you still get some nice shadows to give his face volume. If either light had been brought around closer to the camera axis, they would have overlapped and been flattening to his facial structure.

Once I had a good lighting ratio, it was all about getting a good pose, and composition. It was so nice to have that freedom of knowing I would get good light, and be able to focus more on the portrait experience. I could switch lenses quickly for different framing aspects, and I mostly used my 28mm, my 35mm and my 85mm lenses.

andres-2

For this headshot, I would have changed the height of the rim light so that his collar didn't create such a harsh line on his chin. The light was in a ditch and it was already at it's full height. I should have moved the model to the ditch and placed the light a full meter higher to ensure the collar didn't cast a hard line across his chin.

There is something to be said for using classic lighting setups. You can be sure to achieve a nice result lighting wise, and can concentrate more on the subject and the composition.

View the rest of the set.

Saturday, November 1, 2008

Simple portraits

Agust_portrait-1

Settings: Ambient is 3 or 4 stops underexposed. Left light is a flash into a silver umbrella at 2 stops above neutral grey, and right flash is through a Lumiquest softbox 2 at 1 stop above neutral grey.


I have felt a bit like I might be trying too hard to deviate from "safe" and standard lighting, so I have been wanting to try some more traditional lighting setups. By putting the umbrella at the same height as his head, and aiming it horizontally instead of angled down, it emulates window lighting quit well, and is very soft. The right side light does an ok job of filling, but I think either another umbrella, or just bouncing that flash off the ceiling to raise the light of the room would have looked nicer. It would have kept the harsh shadow from the left side of his nose.

The background is just a piece of black posterboard taped to the wall. I'm going to add to my kit a length of black, and white fabric to use as quick backdrops.

goth_agust-1

Settings: Ambient is 3 or 4 stops underexposed. Left light is a flash into a silver umbrella at 2 stops above neutral grey, and right flash is bare, zoomed to 105mm at 3 stop above neutral grey.

For this shot, first Agust got ready for the Gothtasm Halloween party by dying his hair and applying makeup. Since it was such an effort, I decided it would be good to document it. This is a fairly standard setup also. The silver umbrella is a little high and aimed down, to produce nice directional lighting. The right flash provides a really nice rim light along the cheek and back of the head, for a bit of separation from the background. I think this is easily my favorite lighting setup.

I had to get in on the action too.

goth_ben-1

As a slight aside, I recently purchased a photo editing monitor. The HP LP2475w. It's a 24" monitor that uses an S-IPS panel, which is a true 8 bit panel, that does a very wide gamut of colors. It's a huge upgrade from my little 17" laptop, both in color accuracy and brightness. I also got a monitor calibrator to ensure color accuracy. Even just looking at other people's photos is more fun now, because I can see so much more detail and dynamic range. I highly suggest ensuring you have a good monitor with accurate color (either an S-IPS or S-PVA panel, not all LCD panels are made the same way, TN and TFT which is the most common used panels, are not true 8 bit color) and a monitor calibrator to ensure you're getting your colors correct. I know I've been over compensating for my poor monitor quality in past photos by pushing the contrast and colors a bit too far.

Monday, October 27, 2008

Fishtank

fishtank_test-2

Settings: Ambient light is -3 stops below neutral grey. Green rim light is +1 stops, and Main fill is +1 stops. Rim light is from the right, through the fishtank, slightly behind the subject but aimed toward subject head. Fill is snooted and aimed directly at head, and is forward from subject and to the left (of camera).

This was a quick test over the weekend for a shoot I have coming up. I wanted to be more familiar with the setting, what works, and what doesn't. The main worry of mine, was that I wanted a flash coming through the fishtank to use as a rim light. It took some experimenting to get it to work. First I tried putting the flash on the opposite side of the tank pointing forward, but that created too much flare, and didn't give me the rim light I was looking for. Then I put the flash on the right side of the tank, and aimed it forward. This gave me the rim light that I needed. Now it was a matter of balancing ambient and the main flash.

On the above photo, the green light on the right side of my face is the rim light from the flash aimed through the tank. Even though the flash was at 1/1 power, and full 105mm zoom, I had to bump the ISO up to 400 and drop my aperture to f/3.5 in order to get that rim to the brightness I wanted. This was my hard point around which all other settings had to revolve, because this was the only option that worked.

Next, I figured out my ambient level by opening the shutter till it was where I wanted (I almost always start at 1/250 shutter when using flash) I wanted the ambient to remain dark, so it's about -3 stops from neutral grey. I had a few with it opened up more, but it was not enough contrast for my taste, and the fishtank started to blow out.

Now that I had my ambient balanced with the rim light, I needed my main light. I started with it at 1/128 and 105mm zoom, aimed directly at the head, but this was still too bright. The face where it hit was completely blown out. Since the 580ex doesn't go lower than 1/128, and I didn't have any ND filters with me, and the other settings were already anchored down, I only had one choice, and that was to start backing the light away from the subject. Every time the distance doubles, you get 1/2 the light. The more I backed it up, the more of the subject that would be lit, and I wanted it restricted to just the face. I popped on my grid-spot, to constrain the light to a tighter beam, and that did the trick. I got my main, ambient and rim all balanced in a way that worked.

After shooting, there was some cleanup. I had an unsightly shadow on the right from the snoot, and some junk in the fishtank that didn't add to the composition. This is where Photoshop comes in.


First, I boosted the shadows a bit. I could have gotten this by opening the shutter another 1/3 stop when I was shooting. Next, I cooled down the white balance of everything but the subject's skin. Then I removed the shadow on the couch and grey fishtank, and then cloned out the junk in the fishtank itself. Finally I used highpass and smart sharpen to bring a little extra medium and micro contrast to the face and hands.

Now I feel prepared to do a more elaborate shoot in this location based on this experiment. The majority of the problems have been solved, and I'll just have to concentrate on composition with a group and directing my subjects. If I'd left these technical aspects till the shoot itself, I would have either frustrated my subjects with all the back and forth, or I would have rushed myself and not gotten the result that I wanted.

Thursday, October 23, 2008

Kitty Cowboy

kitty_cowboy-4

This was an incredibly fun shoot, and came together so well for such a last minute thing. Some of it was luck, but also just developing a shooting style that works fast and furious and being really comfortable with my gear helped a ton. Because of how cold it was, I had my lighting stands already assembled with umbrella swivels attached, flash attached, and skyports velcroed and plugged in. This let me start shooting within about 5 minutes of arriving to the shoot location.

The settings for these was fairly simple, and I'm going to follow David Hobby's advice and stop listing details and start listing the useful information.

Camera was set to about -2 stops from ambient (meaning the sky was about middle grey, and the model was almost black with no flashes)
Flash one was set to +4 stops from ambient, and flash two was set to +2 from ambient level. This means flash two was making sure the model was properly exposed, and flash one was giving me some bright rim light.

I started by shooting without flashes, and getting my sky at the exposure that I wanted, ignoring the model. Then I raised one flash stand to full height, and one to about waist height. I was planning to use the tall one for my bright rim light, and the low one for fill. As I shot, I was constantly repositioning the flashes to work with the pose and setting. This is where having light, easy to relocate light stands was a real benefit. Every time I wasn't happy with the light position, I just picked up the stand and moved them. No cables, no weights, no light mods to worry about.

kitty_cowboy-2

For this one I wish I had lowered the output of the secondary flash (the one on the left) so that her face wasn't lit so evenly, but it worked out alright.

kitty_cowboy-1

These old gears were too awesome not to use as a prop.

For these shots, I tried using my flashes "un gelled" meaning they were pure white. This way I can color correct afterwards. It takes a bit more time, but I was finding that I was doing this even on my gelled shots to match everything just the way I wanted. This makes it faster for me to not have to use and balance gels, knowing I will do the correcting at the end.

I also placed the stronger light always in the same direction as the sun light was coming, so that it would look more natural. I think in the first shot, it isn't completely apparent that flashes were used, which is a look I'd like to be able to control on command.

There are more shots in the remainder of the set.

kitty_cowboy-3