Sunday, January 31, 2010

first_shoot_with_light_panels

stefan-3

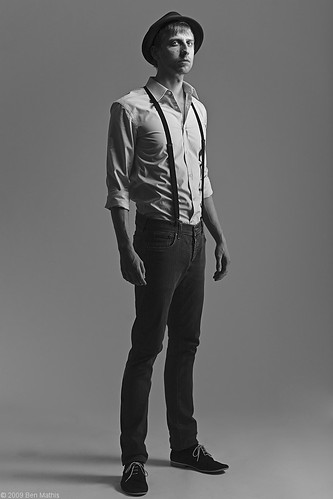
Settings: Ambient is effectively gone. Not sure the ratio between the two flashes, but the output is 2:1, the main on the face double the brightness of the side light. The main is in a less efficient modifier, but it's also physically closer. I'd say side is 1 stop over neutral grey, and the main 1.5 stops.

This is a first shoot for a couple of techniques for me. It's my first real shoot using the giant panels I reviewed in the past post. I really like how soft the quality of the light is. Works great as a fill with the small softbox acting as my main to draw attention to the face. This is also the first time I worked with a remote shutter and the camera on the tripod. This was immensely freeing for directing the subject, and I could really focus on connecting with him, instead of hiding behind the camera. I was able to be closer to him physically, for a more human interaction as well.

Here is the setup shot. Click through to the flickr to see notes over the different lights:

stefan-4

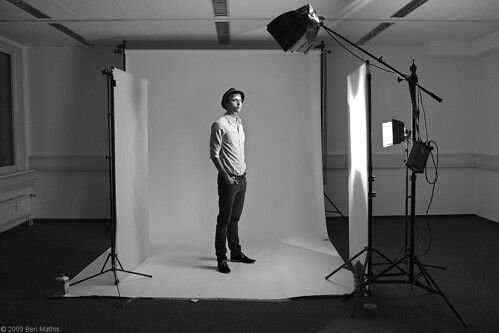
Real quick rundown. The Quadra pack is a 2:1 asymmetric pack. The small softbox is in the A head, getting double the output of the side light that is aimed into the panel. This is as full as I could fill the panel without serious spill on the background, but I would have preferred to fill all of the panel for a more soft and even light. The main head is in my 30x40cm XXS softbox with the 20 degree grid. This keeps it right on his face, feathering off down the torso, and the grid keeps it from spilling on the background. The 2nd panel is providing a reflector to keep the shadows from going pitch black. I could bring it closer to fill them more, or further to create more contrast. Without that 2nd panel all together, the shadows would have been jet black.

This barndoor solution isn't working yet. The default reflector is just too wide angle, so even with the barndoors closed almost completely, it can spill out over the edge. I'm in the process of buying the 18cm reflector which will give me more control.

I was able to set everything up in about 30 minutes, including the background (borrowed from a friend). Since I was working with a tripod and remote trigger, I was able to test the lighting on myself before the subject came, but I'm looking forward to next week when I'll finally have my light meter. My settings will be much more accurate from then on out, as so far I've been guessing at ratios. Once he came I fine tuned the placement of the softbox. I have wheels for my light stands, but didn't bother to bring them this time, and I really wish I had at least brought one set, as positioning the boom stand with the softbox was a pain without them. I also need to make a small strap for attaching the quadra power box as my boom counterweight.

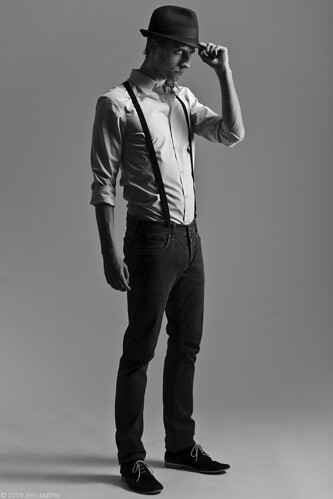
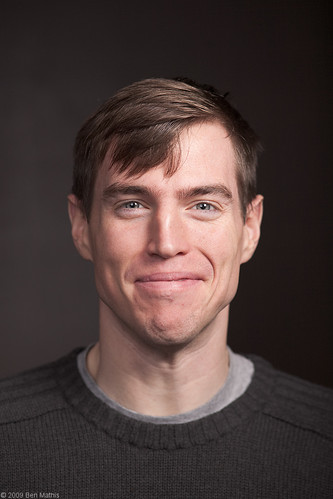
The shooting session went really well with the remote trigger. He had never been in a shoot before, and was a little unsure, but being able to be close and use full hand movements and body language to show poses and communicate was a real positive. I don't like working at f/8, as the background didn't need to be in focus, this was at f/4. This enabled me to use the pack power really low, like at 80 watt seconds for the main, giving me insane recycle times. I never had to wait, it was always ready for another pop. That enabled me to get some really great mid emotion shots like this:

stefan-2

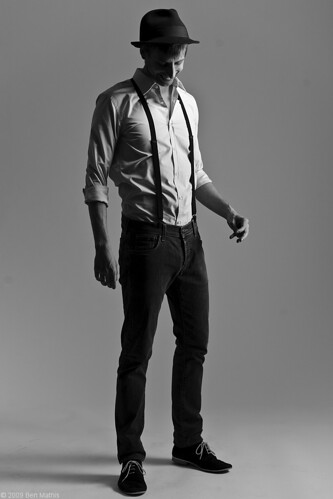
Working with modeling lights is really great, for those readers who only use speedlights. For perfect placement of the light, especially on the far eye from the light source, it's really key. This specific shot relied on very carefully directing the turn of his face to be just right:

stefan-1

Sunday, January 17, 2010

light_panel_review

Calumet Light Panel Review

For anyone who has not watched the Best of Dean Collins lighting dvds, I cannot recommend them highly enough. Here is a preview video:


Order them here.

Even just the two preview videos can teach a ton. Sadly the lightform brand is no longer sold, so I was hunting around for what the most equal equivalent is. It seems that Calumet's light panels are the most similar, but made out of aluminum rather than PVC. Since there is a Calumet in Dusseldorf, I purchased 2 frames, 2 diffusion fabrics, and 2 clamps. I plan to make my own black/silver version, but fabric store white fabric can introduce unwanted color casts, so I wanted to purchase the official diffusion fabrics, which were also the cheapest. The photos online aren't so great, and I couldn't find any reviews, so this is serving to show how the system works with closeups.

Panel frame itself:


It's made out of thin aluminum tubes, very lightweight, the whole thing probably weighs less than 2kg. It has a shock cord running through it, and square indents that keep it from being able to twist, which adds extra rigidity. It does not flex in the middle like the PVC versions. You can assemble it just like the frames in the Dean Collins videos, but they don't shake together quite as easy. Maybe after some more usage, but it's easy enough.

The Clamp:


The clamp is identical to the one in the videos, with the added benefit of having a clamp that really holds onto the tube. It can be clamped to almost any tubular surface, it rotates, and the middle T-bar can be screwed tight to the holder to clamp the angle tight, not allowing the frame to rotate. One alone is not sturdy enough to hold the frame from the side, but if you clamp it to the top of the frame, you can hang it and it's secure. It's more likely to use two, one on each side of the frame.

The diffusion fabric:


It doesn't completely even the light, as you can see when the panel is severely under exposed, but I haven't found it to affect illumination of the subjects at all. If you photograph it so that the flash isn't directly visible, as in the 2nd image, you get a fairly even soft white light. I also bought the double clips, and can clip both of them together, with diffusion panels on both, for a giant 2x2 meter wall of soft light. Unless the flash is positioned perfectly, you cannot see the light leaking between the two panels, meaning you never have to worry about a line of undiffused light shining through when using them clipped together. The fourth photo shows the panel from the flash side, showing that while the material is thin, it can be used as a reflector, no real need to buy the white fabric panel. I plan to make a double sided black/silver panel, and I would put the silver side on the other of the white, for a more efficient bounce. The 5th final image shows a real white reflector to show the difference in bounce efficiency. The real white fabric would most likely be more reflective, but it's quite expensive, and only comes with either gold or silver on the opposite side. If they made a double sided black/white I might have bought it.

Examples:


The two panels together give incredible soft light, in fact I have a 2x2 meter window in this same room, and the lighting is near identical in terms of it's directionality and softness. Now I can reproduce it at will at any time of day.


Even when I backed the subject up quite far, these panels are so large they still produce quite soft light. this is probably 3 meters from the panels.


This was a quick test to see how they would work as reflectors. Obviously the harsh bare flash is not flattering on the subject, but you can see a nice bit of bounce filling in the shadows, especially on the side of his temples.


These last two show how reflections are treated. Even with the hot spot, it seems to reflect as a solid white surface, which is great for revealing shape, and the large size keeps it from blowing out to a pure white highlight.

Use this link to show the different products from the Calumet panel line. I bought the large 107x198 cm panels, and the white diffusion that goes with it, plus two clamps, but they have kits as well.

The main problem I have now is not having barndoors that fit the quadra reflector. I intend to look around a bit, and even try a DIY solution I have cooking. Barndoors enable to you keep the light only to the diffusion panels, rather than spilling past to a background or the ceiling.

Tuesday, January 5, 2010

second_light

new_years_2009-4

Settings: Ambient is gone, main is from the small softbox with grid on camera right, 1.5 stops above neutral grey, and fill is from a large 110cm silver umbrella almost directly behind the camera even with neutral grey.

For Christmas my husband (that's him above) got me a 2nd S-head for my Quadra. I can now use 2 lights again. It was freeing having only one for a while, and I imagine I'll still use just one for a lot of photos, but now I can bring in two when I need it.

This was a quick test with using it, as well as a long term series I want to do. A mugshot of each of us every year at New Years (our engagement anniversary). I got the idea from another family that did this from the 70s through the 2000s, including when they added their kids in. I forget where I got it from, but you can see the sequence here: http://www.poopinmymouth.com/wip/age_family.gif I have a long way to go to get that far, but it's good to have some extremely long term projects.

new_years_2009-9

Settings: Ambient is gone, main is from the small softbox with grid on camera right, 1.5 stops above neutral grey, and fill is from a large 110cm silver umbrella almost directly behind the camera even with neutral grey.

If you look closely in the eyes of the large version, you can see the placement and relative brightness of the two mods. The umbrella is the dimmer fuzzy one in the center, and the softbox is the square in the upper right of the eye.

I've been studying Dan Winter's work, and I love how he controls the shadow density with a ringlight. I'm not a fan of actual ring lights, but the principle of using an on axis fill (something strobist fans will be familiar with) is really appealing. Right now the Quadra can only do a 2:1 ratio, so I can only play with distance, but I plan to build some mesh covers that give me 4:1 and 8:1, as well as letting me drop a single head even lower than the current minimum of 8.2 watts. By placing the umbrella directly behind the camera as a fill, every surface you can see gets light. This way you can keep your shadows from going black. If you move it off to the side, you run the risk of creating pockets of shadows which normally looks awful. Fill goes on axis, or as close as you can get without coming into view of the camera.

One thing I really like about this, is that I still have my super contrasty main light, my small softbox with grid, but I can keep the shadows under control even in an indoor environment. Most of the time I use ambient as my fill when doing outdoor stuff, but now I can bring it in even indoors easily.