Tuesday, June 21, 2011

red_heads_setup

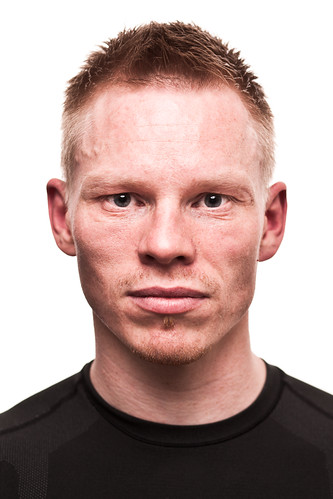
Recently I took another shot for my red-heads series:

IMG_6602.jpg

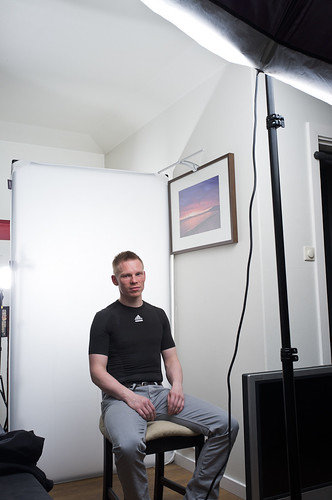
and I managed to snap a wide angle shot of the lighting setup I wanted to share:

DSCF1905.jpg

On the far left, you can see one of the Quadras, this one was plugged into the B port, so it's pumping out half the light of the main, all the way in the upper right, which is shooting through the 1.5 meter Softlighter. The back light is directed through a white scrim on an aluminum frame. I have both scrims on it, one on each side, to soften as much as possible. This is providing the pure white background of the image. Then the Softlighter is from directly in front and above, at a 45 degree angle, providing the main light.

Tuesday, May 17, 2011

second_shoot_with_x100

DSCF1402.jpg

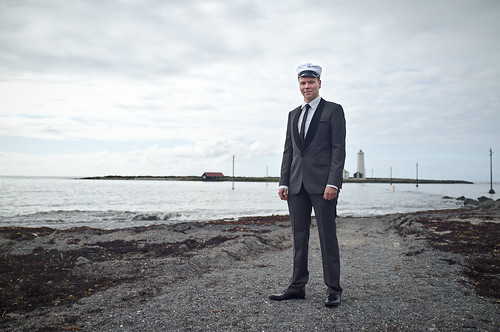
Last weekend I did a portrait shoot with a friend who is graduating (hence the traditional hat). He wanted some images to use for both the graduation brochure, as well as facebook all done at the same time. I had a few locations scouted beforehand that would work well, and asked him to bring his graduation suit and hat, plus a few other outfits in case we needed to switch.

The light cooperated and was quite nice, soft and directional, and it got sunny toward the end right when we needed it. I directed his poses while keeping the light's direction in mind to hit his face in a pleasing way, mostly choosing short lighting, as I prefer (short lighting is where the front and far side of the face are lit, and the close side of the face you can see is in shadow, apposed to broad lighting where the front and front side are lit and the far side you can't see is in shadow), I had the X100 on one shoulder, and my 5D with 85mm 1.8 on the other. With both I shot at maximum aperture, the X100 had way way less purple fringing and was much sharper at it's max aperture of f/2 than the 85 was, but I probably should have stopped the 85 to f2 as well for a sharpness increase, but I wanted the shallowest DoF possible.

For the first image in the blog, I was sitting on the ground (in order to make him look more grand and tall, and to get mostly sky in, rather than boring ground), with the X100. I had the 3rd gridlines projected so I could put his face in one of the points of power, as it was a wide shot and I needed help guiding the eye to his face. The light was coming from the left (his right), so I had him turn in that direction. With guys I normally try to get them to stand naturally with toes slightly turned out, and ask them to bring their shoulders up and back, but then try to settle so they are comfortable and not stiff. Early on I tell them I will be directing their face turn for lighting purposes, so it's easy to use my index finger to ask them to turn closer to me or further away. Sometimes I use the command, "Ok, now with only your eyes, look at me", otherwise they will turn their whole head from the previously chosen position. For postwork, I adjusted contrast and clarity, white balanced it to be a bit less blue, then added one adjustment brush to the sky to bring it down and add contrast, clarity, and a bit of blue, and another adjustment brush on his face to bring it up, add clarity, and increase saturation a bit.
DSCF1397.jpg

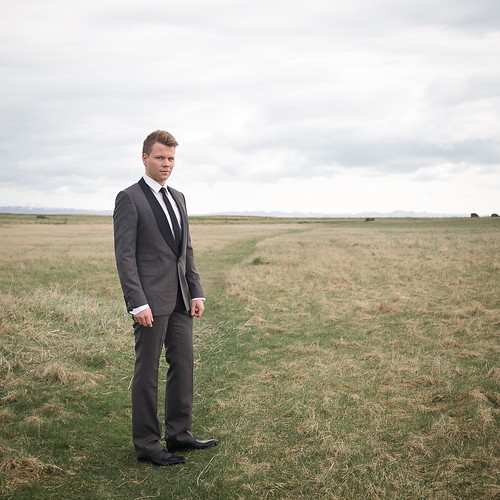
In this one I was kneeling, as I wanted both sky and ground, as I found this grass path to be a great setting. The light was coming from the right, so I positioned him this way so it lit his face in short lighting again, this is why the front of his face is brighter, giving it volume. If we were turned the other way, (to the left) this soft light would hit the back of his head, giving his skull volume, but leaving his face relatively flat. In post, I desaturated the greens a bit, as it was overwhelming the scene, cloned out a few distracting clumps of grass, used an adjustment brush to bring down the sky and add a bit of blue, and up clarity, and then overall scene contrast and clarity adjustments. I also have a special sharpening setting that adds micro volume, rather than really sharpening the edges too much. It uses a very wide radius, and a high masking value so only hard edges are affected, and in a broad, rather than narrow way. I apply this to every image, and change the amount depending on the output size (full amount for the web, 30% for full sized prints).

I love how sharp the X100 is at f/2, with no chromatic aberations or purple fringing. It allowed me to throw the background slightly out of focus for some nice subject separation, while still viewing the background's contents.

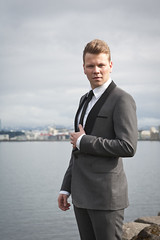
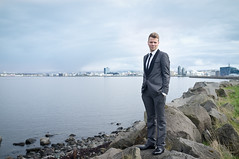
Just to follow up on my last post about focal lengths, here are two shots in the same location. First with the 85mm lens on the 5D and second with the 35mm X100:

IMG_6565.jpg DSCF1419.jpg

The one with the 85 is tight, and is definitely about the subject as a portrait. It's flattering and cinematic. The 35 is wider and shows the entire cityline of Reykjavik. Neither is better or worse, but they both offer different things. One is a portrait that could be made in any city though, and the other was definitely done in Iceland. (the dark square on the far right is Harpa, the new opera house, and the grey point above it is Halgrimskirkja, the most famous landmark in Reykjavik, the tall dark apartment buildings are also very iconic as part of the beachfront skyline)
DSCF1409.jpg

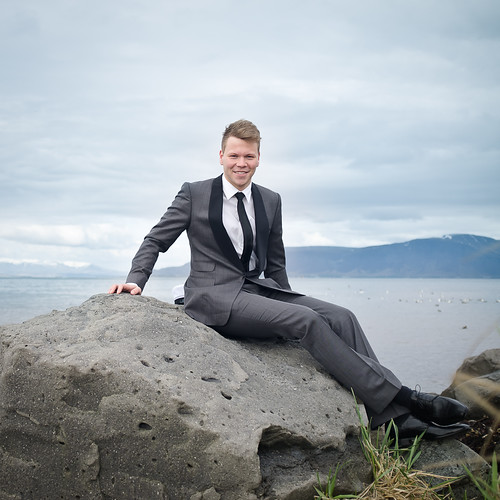
Not the most masculine of poses, but I think it works. The mountains in this direction behind him were so beautiful, and the light was still cooperating. In odd poses like this, it's really important to ask the subject to "settle in" so they feel comfortable. You can see a noticeable difference after they do it, much more relaxed. I might fine tune a pose, but before I take the photo I ask them to get comfortable so it doesn't look too stiff and awkward.

Monday, May 9, 2011

focal_lengths

I was going to write up a forum post about lens lengths, but I figured this would be a good topic for here instead.
I shoot with 3 lens focal lengths, 35mm, 50mm, 85mm. If shooting on a crop sensor, to emulate this setup, you'd need a 24mm, 35mm, and 50mm lens. These correspond to moderate-wide, normal, and short telephoto. What do I mean by this? Normal means that size ratios line up with what our eyes are used to. Put a person 3 meters in front of a known object like a fire-truck, or a door, and the ratio of the two in how the lens renders them on the camera's 2d plane will look just as our eyes see. Wide means now that far object will look a bit smaller than it should, but since 35 is only moderate wide, you can kind of get away with it. In many situations with a person in the frame, 21/24/28 will look distorted and unnatural. I personally don't like them, but many do. Short-telephoto means that the ratio between objects will slant the other way. The firetruck would look slightly too large, for example. This can be used to one's benefit as well with very long telephoto lenses, keeping the moon huge behind a person, or compressing landscapes, but I find short telephoto gives the affect the way I want it. Off, but not too off as to mis represent reality.
The reason I keep to 3 primes like this, rather than a zoom that encompasses them all like the 24-70mm 2.8, or on a crop, the 17-50/55 from tamron/canon (both good), is because first and foremost, I routinely shoot in lighting situations where I need the extra light. All 3 of my primes are sub f/2 and useable at max aperture. The 35 on my 5D is f/1.4, the 50 and 85 both 1.8. My X100 is 35mm f/2. I find 2.8 too slow for many situations. Secondly, I like having the space between focal lengths. It makes the decision making easier. Expanded, normal, or compressed perspective? With a zoom it's more of a spectrum with lots of choices. Many people like that, but I don't. Creatively I only ever want one of those 3 settings, and having them in set steps helps me focus. In addition, having an out of focus background becomes more difficult the wider your lens goes. So while an 85mm F/2.8 can still give you a headshot with a blurry background, a 35mm f/2.8 at normal viewing distances doesn't really. 50mm 2.8 is kind of mixed bag depending on distance from you to the subject whether you will get background blur or not, but at any distance, F/1.8, 1.4 or even 1.2 will give you much more.
Now for some examples:
35mm

35mm really allows you to get a sense of this space. 50 or 85 would have compressed it too much. You would have only gotten a small edge of the front flower box with 50, less of the branches at the top, and the white area in the back would have been projected physically larger in relation to him, making it more of a middle or high key shot instead of this smoky dark look. Backing up to make 50 work would have made him much smaller and it would no longer really be a portrait. 85 would have made all these issues worse. 35mm gives you a sense of setting.

50mm


This one needed a lot of size ratios going on, and it was already unrealistic and surreal to begin with, so I didn't want to muck with perspective at all, hence the 50mm. 35mm to keep him this size and the front bench would curve away, and the back benches would be very small, and the path wouldn't look very deep or three-dimensional. 85mm would not have shown the side-most benches at all, and the background would look very large and tunnel like. In order to get the whole bench in, I'd need to back up a lot from where I was with the 50, and that would require him being much smaller in the frame.

85mm


This one, the background was very important to the shot. That far building over his right (our left) shoulder is the Dom Cathedral in Cologne, Germany. With a 50 or 35mm, it would have been projected incredibly tiny, and the darker areas around him of the less populated residential area of Cologne would have shown more, making it a less bright and less city-ish feel. He was also on a cramped balcony and I was inside the apartment shooting out. A 50mm might have allowed me to still get all of him without showing the door frame or other parts of the balcony, but the 35 definitely would have unless I got so close as to make him look very distorted.

I chose these three shots specifically because I had decided on the lens focal length before even getting to the location to shoot (or from the original location scout) but they were specifically picked for their affect on perspective. Also because all three relied on fast, sub-f/2 apertures, as all 3 were shot at the widest aperture, either to let in enough light on the 2nd two, or the provide a bit of background blur on the first. Could I have shot these same images with a zoom and had them look very similar? Possibly, but my creative process doesn't work that way, and I like the freedom that this limitation actually brings creatively.

Wednesday, April 20, 2011

x100_and_natural_light

DSCF0589-Edit.jpg

Long time no post. I set my sites on a new camera, and my old one became a neglected orphan on the shelf till I got the new one. It was stupid, but I kept thinking of ideas and how I wanted to do them with the new camera, not the old. But, that time is past, I have the new camera and have been shooting a lot. Mostly non portraiture with no lighting, but if you are curious, check it out here. Low on commentary, big on photos.

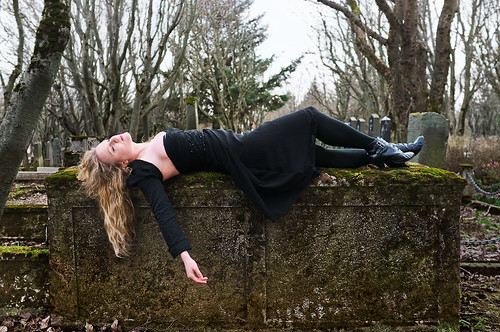
A friend of mine who I'd shot before, but never one on one, emailed me asking to do a shoot. I had a free Sunday and started thinking of ideas so I said yes. Immediately I thought of how I wanted to shoot in the cemetery near my house again. I had two images start to coalesce in my head. The first was in black, and something to do with mourning. I wasn't sure the pose, but in my head it seemed it would be standing and looking wistfully at a gravestone. We tried that early and it was so painfully cliche we moved on quickly. I saw this moss covered wall and knew it would work well.

For the lighting, it was a very overcast day. No flashes used. I wanted to find an area where we had a bit heavier tree coverage overhead, with a more open space further out. This would give some shadows in the front, and a rim-light type soft light coming from the background. This would also give a high-key background so the foreground could anchor with a bit more shadows.

I let the camera meter everything, which fit all the values in. Her skin is slightly over exposed, but I like the look it gives next to the dark dress. The post work was simple. I cloned out a small strap on the skin, removed a blueish cast from the dress and used curves to darken it a little. The wall she is laying on had the contrast bumped, it was sharpened an extra amount so her skin would look extra soft in contrast to it, and the green moss under the small of her back I bumped a little with a curve so it emphasized the line of her body. On her face I did a small amount of blemish removal, and evening of the makeup color around the forehead. Very little body touchup in comparison to many of my images. I also made a selection along the silhouette of her body, and darkened the background using an exposure layer, so that she would pop a bit more, light against dark.


DSCF0602-Edit.jpg

After the first half of the shoot we walked back to my house to warm up, change outfits, and I wanted to get a wooden chair as a prop. I had envisioned something like this shot in mind, though her outfit was of her choosing, it fit what I wanted as a timeless sort of feel. I wanted a setting with a bit of framing. Something on both sides, and a branch at the top anchoring downwards, so I could go really wide while still having her stay the focal point. The focus was actually missed on this, it was far forward, but I loved what it did for her skin and hair, very glowy and soft. I used photoshop's lens blur function to hide this fact by blurring the front so it feels like the focus is where it should be.

For post work, I added an exposure layer that darkened and roughly outlined her hair, as the line between hair and glowy background wasn't as strong as it needed to be. I added a yellow layer set to screen, and adjusted it's clipping properties to only affect the lightest areas of the image, and masked it away from her body so it didn't affect the skin. This warmed the image slightly. I then did the same thing with a purple layer to cool the shadows so the image would have a balance.

Monday, January 17, 2011

photo_book

This is a bit old, from 2008, but I have ordered several copies for myself and family, and the quality of the prints are really nice. All the photos are full page, no text to distract, left side is from Finland, right side from the Ukraine. I have enabled the full preview, so what you see is what you get. It's easy to share, so I figure why not?

This one is new, from just before Christmas.

Monday, November 22, 2010

svavar_shoot

svavar.jpg

Settings: Ambient is underexposed by 1/2 stop, and face is properly exposed using a small gridded softbox just outside frame left.

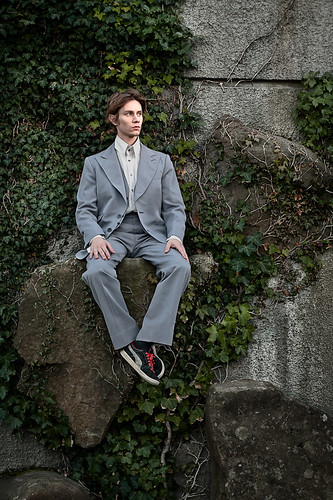
I saw this location when walking back to work from a coffee shop and knew I had to do a shoot. Their are boulders embedded in the wall, and ivy growing along the side. many of the boulders are high enough I knew I could crop out the ground and remove the sense of how high it was. I asked a friend to sit for me, and asked him to wear a suit. He told me he only had an older ill-fitting suit, but knowing his look, I thought it might work. He showed up in these ratty shoes, and at first I was a bit disappointed, but I think they work with the look. Newer shoes would have shown how disheveled the suit is.

Lighting was simple. I set my camera on a tripod and got the framing I wanted. At first I was using my 85mm lens to flatten everything, but I wanted to see a bit more of the wall, so I switched to my 50mm, which let me go closer and keep him larger in the frame while still showing a lot of the wall. Once I had that setup, I underexposed by 1/2 stop, set my small gridded softbox to the full 3 meter height of my light stand, and aimed it at his head height. I used the light meter to power the flash so it was properly exposing the face. This would give me a bit of focus on the face, without too much of a light intensity difference.

Once that was set, it was just a matter of getting a pose and expression I was interested in.


This image shows the before and after of the post work. I found the image overall was a bit too bright, and the wall lacked volume because the day was fairly overcast. I used the adjustment brushes in lightroom to make the top edges of the boulders pop, and another to deepen some of the undersides of ivy and boulders. Then I took it into photoshop, gave a bit of white sleeve to his left hand so it would look more balanced, then underexposed the whole image another small amount while leaving the face untouched. I cloned out the few small imperfections on the face not visible at this resolution, and went through my normal sharpening procedures to give more micro contrast.

Monday, November 15, 2010

camera_and_light_gear_advice

Too long since a post, so I'm going to do a quick one based on some thoughts I've had this week from speaking about gear in a few forums. I have a shoot coming up this week I will post more real photography on, so never fear.

As photographers we can really get caught up in gear. It's so easy to believe our inability to improve is related to the equipment we own, when in reality the cheapest digital camera is in many ways better than high end cameras of yesteryear. We are limited only by our skills. I have lately forced myself, whenever I get bitten by the gear-bug, to instead of researching or pouring over online catalogs and reviews, to plan a photo shoot idea, and go out and shoot instead. Practice, a photo trip, or a new book (be it instructional, or inspirational) will do far more for our skills than a new piece of equipment.

That said, I want to lay out what I think the basics are, in case you don't have a kit yet at all, or in case you are wondering if there truly is a limiting factor on your current gear. This is assuming you shoot in a similar vein as this blog, mostly portraiture where you control the model placement and can zoom with your feet. None of this will apply to bird photographers or sports journalists.

A camera with wide, normal, and tele lens options.
A light source of some type with at least one constraining option (like a snoot) and one softening option (like an umbrella or softbox) and a way to trigger it.

Wide for me is 35mm, but some people like 24/28mm.
Normal is between 45-60
Tele is over 70, and for me is 85

The reasons for this is your composition. You can keep your subject the same size between wide/normal/tele and totally change what you see in the background. When you want a sense of location, you use wide or normal, and when you want isolation, or a very specific chunk of background, you use the tele, which will also enable closeup portraits without distorting the face.

The light is so that you can brighten portions of your subject, or bring a more pleasing light pattern for it. It's not necessary all the time, but having even a cheap LED panel can really open options.

If I were building a kit today from scratch with my current knowledge and preferences, here is what I would buy.

Perfect kit without waisting money:
Canon 5D I or II
35mm 1.4, or f/2
50mm 1.8
85mm 1.8
Elinchrom Quadra with silver umbrella large/small, softlighter II 60", and XXS softbox and grids, large reflector with 8 degree gridspot insert.

A more budget option would be to go with any decent crop body of any manufacturer with the tamron 17-50mm 2.8 (giving you from wide to tele of good quality and decent lens speed) with a shoe mount flash, or an alienbee setup with vagabond.

The cheapest route would be a Canon s90, and a cheap shoemount flash on a stand, with a white umbrella, and an optical trigger (set off by the s90's flash, just turn flash compensation down so it's as dim as possible)

Remember, we are in this to make photos. Gear can be a hobby on it's own, but then you're not in the business of making images to communicate, you're a collector. Focus on shooting more, pursuing ideas, and use the gear-bug to refocus your efforts on shooting.