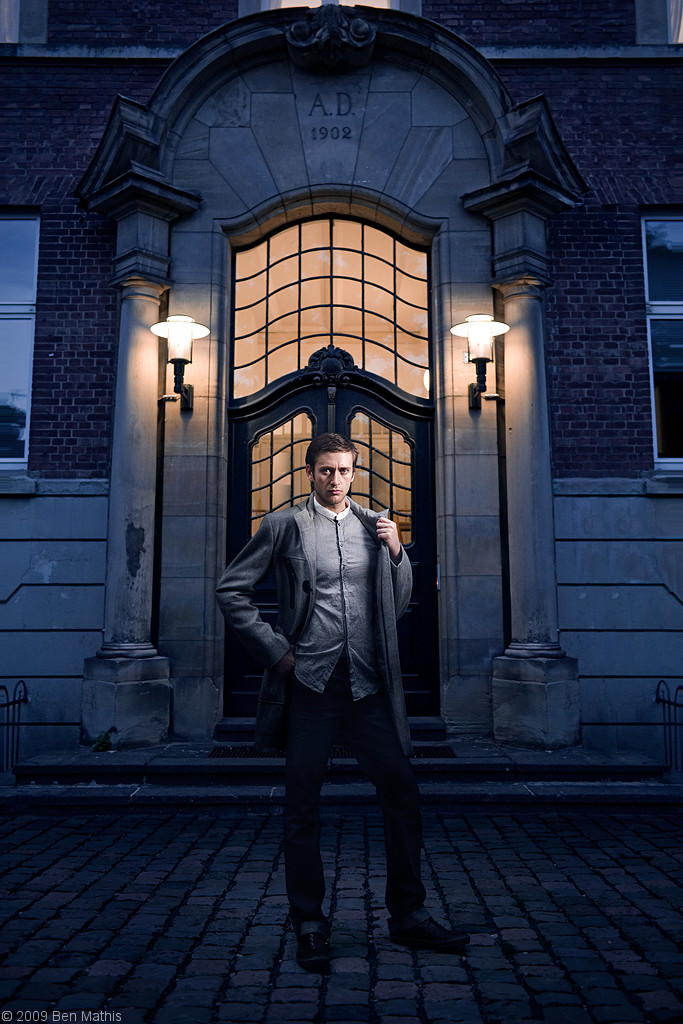
A forum I participate in expressed interest in my workflow of post processing my portraits. This was a recent image I was happy with, so I decided to document my workflow.
For this shot, I worked the way I normally do, in that I find a location first, then arrange a subject and clothing and engineer a lighting setup. I also work backwards from getting my ambient exposure first, and only then adding in flash. My work qualifies as portraiture, but my subjects and their faces are always much smaller in the frame than pure portraiture. I like using interesting environments as framing and compositional elements.
Sometimes this requires compositing, because the environment only has a specific feeling at a time of day where I can't have a model in a helicopter waiting to be drop-flown in.
For this particular shot, I saw this doorway while bicycling past one night, and it just had this timeless, slightly victorian feel to me. I made a trip back out a few nights later at the right time period (it's boring during the day) and worked out which lens I wanted to use (I almost always use my 35mm for these type of shots, but I wanted to see if the extra compression of 50 would still get the door in, it didn't) and how far back I need to be, standing or crouched, and where I would put the model to get them the size I want and to be frame properly.
Straight out of the camera original:

First things first. I try to work from a top down approach. Largest changes first, especially things that will move pixels. I like to work in a non-destructive workflow, with layer effects, which means I use a lot of masks. Moving pixels after making a mask, requires you to either re-paint the mask, or to move a merged copy of the previous layers, which is destructive. That means my first goal is to remove all the crap that dates this as a photo from 2009. Garbage cans, metal pipes, placards, etc, all have to go. I purposefully lined up the image to be centered and completely parallel to the film plane. This means I can use uncluttered areas of the left side to cover up clutter on the right.
So I duplicate the whole layer to a new layer, and flip it from right to left:

Next I apply a mask, and invert it. This hides the entire layer. I am now free to reveal the layer by painting into the mask. The next image shows my mask, overlayed onto the original layer. The white parts are where I've revealed the flipped image, essentially covering what's underneath. To recap, I'm covering the original image, with the flipped image, using a mask.

This is just that duplicated and flipped layer, showing only what the mask is allowing to be revealed.

Here is the combination of that flipped info, and the original layer:

This is all the info I can salvage easily. Now I have to clean up manually. I create a new blank layer, use the clone stamp tool, set to "sample all layers" otherwise it can't clone because it's on an empty layer. I now grab info from nearby areas that will cover the remaining metal bits easily. I do this on a new layer, because the normally end up either too bright, or too dark to match the surrounding materials seamlessly, so by having them on a new layer, I can just marquee select and use dodge/burn, exposure, or curves to get it to where it matches the value and color much better. If it still shows some borders, then I break out the healing brush to properly blend together, but this image didn't need it. This is just that empty layer with the clone stamped bits:

And the result of this layer on top of the previous ones:

Next I do some sharpening, using the high pass technique I've posted before, as well as a smart sharpen. The final background plate:

Once I arranged the model and shoot time, we headed out and I took the photo. It was in the same location, but it was much earlier in the day (model was limited on when he could come). This was both a blessing and a curse. The good part is that the higher ambient level opened up the shadows on his face, and it's easy to darken to match the original. The bad news is that right out of the camera, it didn't match at all.

Large things first again. On the subject, the large things are always proportional changes. I often use the liquify brush to lengthen or compress, widen shoulders, narrow waists, etc. For this, I straightened his stance, and used liquify to bring his waist area a bit narrower. I also used some dodge/burn to bring out his pectoral muscles a bit more.

Next, I didn't like how sloppy the hang of his jacket was. It made him look really wide, and it was visually too heavy. I used the lasso tool to grab the hanging portions, and lifted them to a new layer (you can do this with ctrl+j) Then I used the warp transform to make it sit snugger to his body, while still looking like it's hanging. This left some gaps which I filled with just the paint brush tool, color picking from the surrounding fabric and just connecting the gap. Here is just that layer:

Here it is showing on the layer. You can still see the original jacket showing, but it's ok, because I will be masking the background in over top. I will just make it so the mask covers the old jacket line.

Now I bring in the background plate, and position it over the environment correctly. I have made a mask the shape of the subject to hide it where he is. This is why I made all the changes to him first. If I had made this mask, then tried to make his waist thinner, I'd have to repaint the mask, or I'd need to be editing a flattened layer for no reason:

Two things are immediately apparent. First is that the plate isn't wide enough, second is that the color is way off between the two layers. I started by fixing the background to be wide enough. I duplicated the background plate, and killed the mask. Then I used photoshop's "content aware scale" to make the background plate wide enough. Then I put it below the previous background plate, mask away the center really quickly, because all this needs to do is extend the edges:

Their was a seam between the original un-stretched background, and this one underneath. I just painted on the edges of the mask on the top layer to get rid of it and seamlessly blend the two. Now I have the unstretched background with the tight mask around the subject on the top, and the stretched version below:

Now I want to match the lighting on the subject to match the background. I made a new exposure adjustment layer with -4 exposure on it. I put this layer above the subject, but below the background. Now I added a mask, and only painted on it where the subject needed darkening.

This is the mask of the exposure layer. Full white darkens -4 stops, full black does nothing. I left this layer totally away from the face, to keep the night lighting from the flash, and the fill from the ambient, but on the legs, I added it all over, but mostly to the shadow side of the wrinkles and the leg, where the flash didn't reach. This way it simulates what the lighting would be had the ambient actually been as dark as the background. This layer mask probably was the most time intensive of the steps, because I needed the border from leg to cobblestone to be perfect. If it bled onto the pants, I got a black cartoony line, and if it bled onto the cobblestones, they became too bright. I ended up making a new alpha layer with the magic lasso tool to have an easy selection that would give mea nice border:

There was still too much of a separation between the cobblestones and the stairs. It looked too bright to look natural. Check the image 16, two images back. I added another exposure layer, with -1.5 stops, and just gave a quick brush stroke into the mask where the cobblestone meets the stairs, keeping the stroke off the legs, in order to darken the cobblestone where it meets the stairs.

Now the lighting matches, but the color tone is still way off. I added a color balance adjustment layer,which lets you tint your shadows, midtones, and highlights. It's good for split toning, and especially matching mixed ambient levels like this. Once again this is over the subject, and under the background

The highlights I made a bit more yellow, the midtones more blue/green, and the shadows a blueish purple with some green in it. I knew I needed bluer shadows and warmer highlights, but the fine adjustments I had to eyeball till they looked correct, adding or removing one point on these sliders till it matched.

Next I didn't like how the stairs were so bright behind his legs, it made it feel a bit cutout. I made yet another exposure layer, with -1 stop exposure, and did a quick soft paint brush behind his legs to darken the stairs. This layer was set above the background as a clipping layer. This means it can only affect the layer right below it. It makes it so I can be sloppy with the mask, and not worry about it changing the exposure of the subject.

And finally a quick progression gif because some of the stages are minor enough that you really have to see it change over top of the previous version:

Tutorials related to this post:
Masking: http://www.poopinmymouth.com/tutorial/masks.htm
Sharpening: http://mr-chompers.blogspot.com/2009/04/sharpening.html