
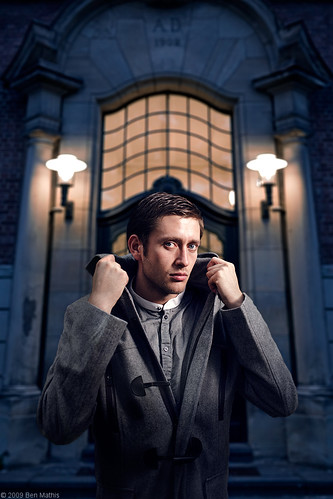
Settings: The background was shot separately with ambient about 2 stops below neutral grey for a dark feel and still allowing the lamps to not blow out. In the subject's image, Ambient is 1 stop below neutral grey, and flash is 1.5 stops above neutral grey.
I've posted the original setting, and a closeup of this shot for the previous masking tricks post, but here is the full image.
Having scouted the door location, I knew I wanted to use a male model, in a dress coat. I asked around for my friends, trying to find someone with a look I could use, who also owned a dress jacket with collars that could be held up. I used google images of pea coats and chesterfields when asking people if they owned what I was after.
If I had the full budget of a paid shoot, I would have scouted for a Hugo Boss grey or black double breasted pea coat. I also wanted a double layered undershirt, something white with a low V-neck showing the upper pectorals, and then a button down blue shirt. However when putting together a shoot with a budget of zero monies, you work with what you have.
We arrived at the location, and I set up while the model changed into the wardrobe (it was far too hot out to bicycle there already dressed). I had already scouted the location, so I knew I was going to use my 35mm lens, I knew about where I'd stand as well. The evening wasn't dim enough yet for them to have turned on the lamps, but in hind sight it worked well, because the ambient provided a nice fill on his face on the non flash side that would have been lacking if it was closer to dark.
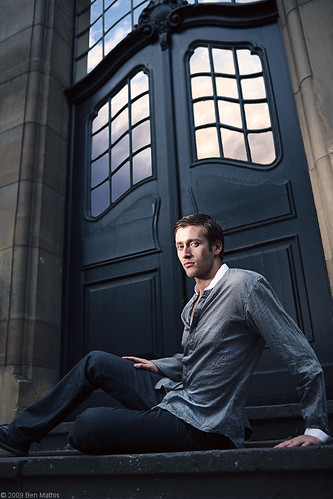
Settings: Ambient is one stop below neutral grey. Flash is 1.5 stops above neutral grey.
In this photo you can see what the ambient levels were like at the time of the shooting. The flash in all these images is in a 30x40 cm softbox with a 20 degree grid. In this image, it is coming from camera left, through a fabric grid to keep the light only on his face, and not on the door or his knee. You'll notice in all the images the flash is set to a narrow lighting pattern, where the flash hits the front of his face, but leaves the side of the face we can see in shadow. I like this lighting pattern best for how it reveals facial details.
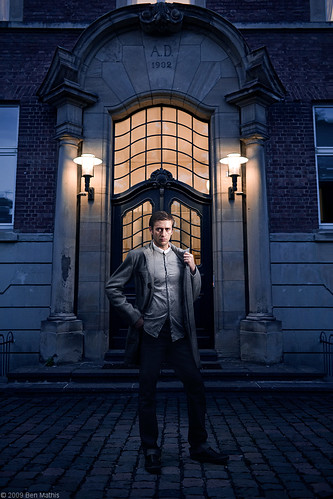
Settings: The background was shot separately with ambient about 2 stops below neutral grey for a dark feel and still allowing the lamps to not blow out. In the subject's image, Ambient is 1 stop below neutral grey, and flash is 1.5 stops above neutral grey.
This image uses the same settings as the first, I've just moved the subject further back, and gotten down on my knees instead of taking at eye level. The background was composited in. The bricks on the ground are from the subject's image, and the background plate had to be extended as it wasn't wide enough. I used photoshops content aware resizing to extend the brick walls without ruining the windows or the doorway. Then I did some reshaping of the jacket, as it was too loose, and then used dodge and burn to give him a bit more obvious musculature. I also slimmed the waist a bit. The hardest part was getting the ambient levels of the subject to match the background, as well as the color toning. The ambient was still quite neutral, whereas on the background plate it had a ton of blue and a bit of purple in the shadows. I used an exposure layer with lots of masking to darken the non flash lit parts to match. Then I used a color balance and a photo filter to tone the ambient to match the background. In the top image, I used Photoshop's Lens Blur filter to add depth of field to the background so that the subject would stand out a bit more.
Before and After:


so good... you're soo good.
ReplyDeleteSo, I'm still waiting on your post about compression in lenses and focal length and such. I'm sure it'll be a good read.
ReplyDeleteThanks for the BTS. Very cool.
ReplyDeleteI'm really glad to discover your blog. I've much to learn and what you are doing with it is a great help.
ReplyDeleteBy the way, I'm trying to understand what you mean when you talk about stops below and above neutral grey, as in "Settings: The background was shot separately with ambient about 2 stops below neutral grey … and flash is 1.5 stops above neutral grey."
Thanks for doing what you do.
John
I'll try to clear it up Anonymous.
ReplyDeleteEven with neutral grey would be "evenly lit" Meaning anything truely neutral grey in real life, would register in the middle of the exposure. Under exposing will darken this, even if it's actually a middle grey, and over exposing will lighten it. 3-4 stops over exposed and you can turn a grey item white. When I say the background was 2 stops below, it means I made it purposefully dark. And the flash being above means I made it purposefully light.
Thanks, Ben, for the speedy response.
ReplyDeleteWould I be correct to understand that in under or overexposing from neutral grey, I would first need to take a reading from the camera with exposure at the mid point, then compensate accordingly up or down? PLUS, the neutral grey reading has to be taken off the brightest area?
And how do you adjust on the flash unit? Sorry about asking what must be a very basic question. I normally set my flash to manual and fiddle around with power setting to get the amount of light I want. So where should my neutral grey reference point be on the flash? I would need to understand this before I can make the necessary compensation from the neutral grey point, right?
Thanks again,
John
Yep, your assumption is correct. I use the spot meter on my camera, and place the spot over an item I consider neutral grey in my scene. I then use the light meter and watch as I adjust downward. I often point it at many surfaces to get a general feel for the exposure.
ReplyDeleteFor the flash, I start without it, and then add it in. I can adjust my quadra remotely, so I guess as to the proper power, take a test shot, and then adjust from there. There isn't an easy way without a light meter to check the flash's exposure, so I eyeball it from my LCD and from the visual difference between the unflashed photo and the flashed version.
Thank you, Ben. You've been most helpful.
ReplyDeleteJohn : )