Showing posts with label terms. Show all posts

Monday, May 9, 2011

focal_lengths

I was going to write up a forum post about lens lengths, but I figured this would be a good topic for here instead.
I shoot with 3 lens focal lengths, 35mm, 50mm, 85mm. If shooting on a crop sensor, to emulate this setup, you'd need a 24mm, 35mm, and 50mm lens. These correspond to moderate-wide, normal, and short telephoto. What do I mean by this? Normal means that size ratios line up with what our eyes are used to. Put a person 3 meters in front of a known object like a fire-truck, or a door, and the ratio of the two in how the lens renders them on the camera's 2d plane will look just as our eyes see. Wide means now that far object will look a bit smaller than it should, but since 35 is only moderate wide, you can kind of get away with it. In many situations with a person in the frame, 21/24/28 will look distorted and unnatural. I personally don't like them, but many do. Short-telephoto means that the ratio between objects will slant the other way. The firetruck would look slightly too large, for example. This can be used to one's benefit as well with very long telephoto lenses, keeping the moon huge behind a person, or compressing landscapes, but I find short telephoto gives the affect the way I want it. Off, but not too off as to mis represent reality.
The reason I keep to 3 primes like this, rather than a zoom that encompasses them all like the 24-70mm 2.8, or on a crop, the 17-50/55 from tamron/canon (both good), is because first and foremost, I routinely shoot in lighting situations where I need the extra light. All 3 of my primes are sub f/2 and useable at max aperture. The 35 on my 5D is f/1.4, the 50 and 85 both 1.8. My X100 is 35mm f/2. I find 2.8 too slow for many situations. Secondly, I like having the space between focal lengths. It makes the decision making easier. Expanded, normal, or compressed perspective? With a zoom it's more of a spectrum with lots of choices. Many people like that, but I don't. Creatively I only ever want one of those 3 settings, and having them in set steps helps me focus. In addition, having an out of focus background becomes more difficult the wider your lens goes. So while an 85mm F/2.8 can still give you a headshot with a blurry background, a 35mm f/2.8 at normal viewing distances doesn't really. 50mm 2.8 is kind of mixed bag depending on distance from you to the subject whether you will get background blur or not, but at any distance, F/1.8, 1.4 or even 1.2 will give you much more.
Now for some examples:
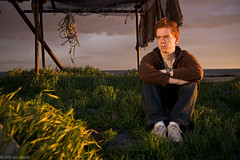
35mm

35mm really allows you to get a sense of this space. 50 or 85 would have compressed it too much. You would have only gotten a small edge of the front flower box with 50, less of the branches at the top, and the white area in the back would have been projected physically larger in relation to him, making it more of a middle or high key shot instead of this smoky dark look. Backing up to make 50 work would have made him much smaller and it would no longer really be a portrait. 85 would have made all these issues worse. 35mm gives you a sense of setting.

50mm


This one needed a lot of size ratios going on, and it was already unrealistic and surreal to begin with, so I didn't want to muck with perspective at all, hence the 50mm. 35mm to keep him this size and the front bench would curve away, and the back benches would be very small, and the path wouldn't look very deep or three-dimensional. 85mm would not have shown the side-most benches at all, and the background would look very large and tunnel like. In order to get the whole bench in, I'd need to back up a lot from where I was with the 50, and that would require him being much smaller in the frame.

85mm


This one, the background was very important to the shot. That far building over his right (our left) shoulder is the Dom Cathedral in Cologne, Germany. With a 50 or 35mm, it would have been projected incredibly tiny, and the darker areas around him of the less populated residential area of Cologne would have shown more, making it a less bright and less city-ish feel. He was also on a cramped balcony and I was inside the apartment shooting out. A 50mm might have allowed me to still get all of him without showing the door frame or other parts of the balcony, but the 35 definitely would have unless I got so close as to make him look very distorted.

I chose these three shots specifically because I had decided on the lens focal length before even getting to the location to shoot (or from the original location scout) but they were specifically picked for their affect on perspective. Also because all three relied on fast, sub-f/2 apertures, as all 3 were shot at the widest aperture, either to let in enough light on the 2nd two, or the provide a bit of background blur on the first. Could I have shot these same images with a zoom and had them look very similar? Possibly, but my creative process doesn't work that way, and I like the freedom that this limitation actually brings creatively.

Monday, June 29, 2009

light, shadow, and specularity

light, shadow, and specularity
Want full control over the light and shadows in your photography? Understanding how light works is necessary, and this paper will attempt to explain how to affect the lighting, shadow quality, and apparent shininess of your subject.


This tutorial is geared toward both 3D artists and photographers. There will be times when I need to make a technical explanation that won't make sense to one group. I'll try to use terms that both groups will understand. All units will be in metric.In this explanation, we're going to focus on the two most important objects in a photo, or a 3d rendering. The light source, and the subject. All explanations will be assuming one light, as it applies to multiple lights identically.


The light source has 4 properties that affect the lighting of the scene.
  1. Apparent size
  2. Distance from subject
  3. Intensity (brightness)
  4. Color temperature

The subject has 2 properties
  1. Surface reflectivity
  2. Surface roughness

We can affect the way the light interacts with the subject, by knowing how these 6 properties interact.
  1. Shadow edge softness
  2. Width of the penumbra (area where light transitions to dark, sometimes called the terminator)
  3. Brightness of specular highlights
  4. Falloff from full light intensity to complete darkness


Light Source
All of the light sources properties are inter related, except the color temperature, which is independent of the other 3.

  • Apparent size
One must specify apparent size, rather than actual size. The sun is humongous, but it's apparent size is quite tiny. A 30x40 cm softbox is considered XX Small, but if it's right next to your face, it's apparent size is large. You can "modify" a light source with a light modification. An umbrella, a diffusion panel, or a softbox are all examples of lighting modifiers. When I refer to the size of the light source, I'm meaning the last surface between the original light source, and the subject. If you put a big translucent diffusion panel in front of the direct sunlight, now the diffusion panel is your light source, not the sun.

As an example. Here is a softbox very close to my good friend, Klaus Nomi:


And the view from his perspective:


now I move the softbox further away:


Now look from his perspective:


Notice how in the last image, the softbox appears much smaller? That is because it has been moved further away. It's apparent size (to the subject) is smaller. The way to keep it's apparent size the same when moving it away, is to increase the size of the light source. In photography, you use a diffusion panel, an umbrella, or a softbox, and just select a larger size than you were using when it was in close.

Larger softbox:


From his perspective:


By increasing the size of the light source, I've kept it's apparent size the same, despite increasing the distance from light source to subject.

  • Distance from Subject
The physical distance from the light source, and the subject. Light works based on the Inverse Square law. If you double the distance between subject and light source, the amount of light reaching the subject will be a quarter what it was. If you halve the distance, the amount of light will be quadruple what it was.

There is a property of light that does not adhere to inverse square, and I will get to that under surface reflectivity. The brief version is that no matter the light's distance from the subject, the brightness of the reflection of the light source stays the same, only the size of the reflection changes.

  • Intensity
The brightness of the light reaching the subject. This can me measured in Lumens, Candelas, Watt Seconds (not an actual brightness measurement, but a reference to the power being used by the flash

  • Color Temperature
Simply, the color of the light. Tungsten bulbs are orange colored. Fluorescent bulbs are greenish. Halogens can be blue or warm. The sun is a bit yellow, the open sky is a bit blue. Most flashes are neutral, but "hot lights" are warm. Sodium Vapor lights (street lights) are the worst, as they are extremely orange, and emit almost no blue wavelengths of light. Most light sources can be corrected for, so that they appear neutral. Add blue, and a orange light becomes white. Add magenta, and a green light becomes neutral. Sodium vapor however, cannot be corrected for to get neutral colors. The easiest way to correct the light, is to photograph something that is neutral in color (a grey card, or a piece of white paper) under that light source. Most photo editing software will allow you to "pick" from this neutral area, and it will subtract any color tint it perceives. This is why it's necessary to use something without color in itself, so that only the color of the light will be present.


Subject
Both the subject's reflectivity and roughness are highly inter related.

  • Surface Reflectivity
A mirror is 100% reflective. The only thing 100% non reflective is special carbon nano fiber fabrics, but for all intents and purposes, the less "wet" or oily a surface is, the less reflective it is. A human eye is highly reflective, as is a wine bottle, a billiard ball, sunglasses, and metal buckles. Most fabric has low reflectivity, as does paper, and rust. Most things fall somewhere between. Human skin, because it is covered in tiny drops of oil, has reflectivity, most plastic is slightly reflective, as is rubber, leather, and rocky surfaces. All surfaces start with a default reflectivity, but it can be altered. Human skin can be either cleaned, or have powder makeup applied to reduce it's reflectivity. Glass can be sprayed with non-reflective spray. Leather can have polish added. Conversely, you can make skin more reflective by adding oil, sweat, or water. Normally it's not a good idea to change the surface's reflectiveness just to change it's apparent shininess. If your model needs makeup, or you want to put water drops on a rose for aesthetic reasons, do so, but just adding powder or anti reflective spray is normally a lot more difficult than controlling the specular brightness, which we'll go into later.

  • Surface Roughness
The surface roughness can be anywhere from glass smooth, to rough like elephant skin. Human skin has texture and roughness, but it's fairly smooth. A wet sphere (like the human eye) is incredibly smooth. Glass vases are smooth, leather purses are a bit rough. Blue jeans are rough, metal is almost always smooth, unless it's brushed aluminum, or rusty. Surface roughness ties in very closely with surface reflectivity. Even if a surface is highly reflective, if it's rough, you will get a more scattered reflection.


Here is an illustration. On the left is a bowling ball. You get one specular highlight from the fact it's just a giant smooth ball. On the right, you have a bowling ball covered in marbles. Each marble has it's own specular highlight, because they make the surface rougher. This is exactly the difference between a smooth and a rough surface. You could also think of the difference between a smooth mirror-ball, and a disco-ball. Human skin has millions of tiny drops of oil, acting like these glass marbles. Black asphalt has tiny grains of sand and rock that are at different angles. A rough surface is essentially a faceted surface, so there is more than one non-contingent area that faces in each direction.


Some objects can have their roughness aligned in a certain direction. Think brushed aluminum, freshly-combed human hair, a Christmas ornament wrapped in thread, or a vinyl record. This roughness is referred to as anisotropy. It will affect the highlight in a way that runs along the rows of roughness. It's best to think of it like the human hairs. Thousands of tiny cylinders all roughly parallel to one another. Each hair has a normal specular like a cylinder, but when seen as a whole, you get a long, narrow highlight. If the exact same surface were perfectly smooth like a bowling ball, you'd get a specular hotspot the shape of the light source. It's the parallel roughness that causes anisotropy.

Example image: (notice how the smooth version is one continuous circle that fades out, the rough version is the same shape, but it's broken up into tiny chunks, the anisotropic turns it into a wide band that wraps around the sphere)

The
way the light interacts with the subject

The entire way the surface is revealed can be controlled by the photographer or render
artist by carefully selecting the appropriate settings.
All 4 properties of light, as well as the 2 surface properties, can be controlled to alter the way the light and subject interact. It's important to know how they interact, for when you desire a specific look for your photos or renders.

First, a quick rundown of the terms for the different parts of light, specularity, and shadow on an object:


The specular hotspot are the bright sharp images of the light source being reflected off the object. They are referred to as hotspots, because in most images, they are overexposed and show up as pure 255 white. The diffused light, is the area of the object being lit by the radial rays from the light source. The penumbra is the edge from where lit area changes to shadow area. This is where the roughness of an object will be most apparent. The shadow is the area not receiving any light from the light source. Unless illuminated by another light or bounce object, it will be completely black.


Shadow edge softness

The edges of the shadows can be razor sharp (like from the sun on a clear, non cloudy day) or super soft and smooth, like on a bright, but overcast day. The main property that controls this, is the apparent size of the light source. Larger apparent sizes create softer shadow edges, smaller apparent sizes create harder edges. The sun, a 3D point or spot light, a hotshoe flash, or a studio light used bare, will all produce completely sharp shadows. This is rarely desired, but when you do want a hard shadow edge, use a small light source. This section also applies to the penumbra, which is explained further into this tutorial.

Here is an illustration for hard edged shadows:


A small light source is binary. The surface of the subject can either see it, or it can't. If it can see it, it's lit. If it can't, it's in shadow. The small source means that the surface will move from lit to shadowed almost instantly, which is why the shadow edge is hard.

Here is an illustration of soft edged shadows:

This results in soft-edged shadows:


A large apparent light source is analog. There are parts of the surface that can see all of the light source, and thus receive rays of light from all of it, and there are parts that cannot see it at all. However unlike the point lights, there is also an area which can see parts of the light source. The less they see of the light source, the darker they will be, and the more they see, the lighter they will be. This gives you a gradient from the area that can see all the light source, to the area that can see none.

The smaller the apparent size of the light source, the harder the shadow edge, and the more it behaves like the point light example. The larger the apparent size of the light source, the softer the shadow edge will be.


Width of the penumbra (area where light transitions to dark, sometimes called the terminator)

The penumbra is controlled almost entirely by the apparent size of the light source. It's slightly affected by the roughness of the surface, and how gradually it turns away from the light. Smaller apparent light sources will create very narrow penumbras, and any surface roughness will be accentuated by all the micro shadows. Any small bumps or dents will have shadows cast. A polished sphere will have a very smooth penumbra since it is not rough, and it turns away slowly. A box has a very narrow penumbra because the surface angle changes suddenly a full 90 degrees, rather than smoothly turning away. Most faces behave like a sphere, and the penumbra should roll smoothly off, but skin with wrinkles or acne scars will show very strongly in the penumbra if your apparent light source is small.

The most flattering light for a rough surface, if you're trying to hide the roughness, is a large apparent light source. This will soften the micro shadows in the penumbra.

Brightness of specular highlights

One thing that has to be explained about specular highlights to truly understand them. Light radiating from an infinitely small point would have no specular hotspot. But all light is originated from something with a physical size; the sun, a flash tube, a light bulb, etc. Each point of this physical light source is casting light out radially. What this means is that there will be parallel rays traveling outwards in the shape of the light source.

The radial rays will fall off, because the further away you get, the more spread the light beams are, and an individual point will be receiving less of these rays. This is why the light "falls off" in an inverse square manner.
However the parallel rays do not fall off. Think of them as tiny lasers, aimed perfectly from the light source itself, onto the object, which then reflects it directly into your eye. Because the light rays are not traveling outwards radially, they maintain brightness regardless of distance. The only decay of the beam will come from the particles in the atmosphere itself, but for any realistic working distance, it will not be measurable.

This illustration shows a very simplified model of this behavior:


Because the light is traveling radially, closer objects get more of the rays, further ones get fewer. This is also why shadows are sharper at the base of an object (like near the feet of a person standing on the ground). Keep in mind that the bulb is there for stylization purposes. You don't actually see a perfect reflection of the light source unless the object is incredibly smooth and reflective. On most objects it just appears as a white shape that is the same shape and dimensions as the light source. (a softbox leaving a squarish shape, and an umbrella a circular shape)


Falloff from full light intensity to complete darkness
As mentioned above, light "falls off" in intensity. You can use this for control. If you put a light source extremely close to a face, by the time it reaches the person's shoes, it will be too dark to register on the sensor. As the distance from light source to subject increases, the less you can use this affect. Best to imagine the sun. Your feet are further from the sun than your head, but it's such a tiny fraction of the overall distance from the sun, that you will get no falloff. If you are 2 meters tall, and the light is 1 meter above your head, and properly bright to light your head correctly, it will be one quarter that brightness by the time it reaches your shoes. This can be used to create focal points where the eye is naturally drawn to.

summary
  • Unfocused light falls off inverse squarely. Double the distance, 1/4 the brightness. Half the distance, 4x the brightness.
  • Surface roughness determines how clearly the light source is reflected. Smooth surfaces give you the exact shape, rough surfaces give you a scattered shape.
  • Apparent size is what's important, not absolute size. A medium source 1 meter away is apparently larger than a giant source 50 meters away.
  • Apparent size of the light affects the softness of the shadow edge and penumbra. Larger apparent sizes make softer shadows and smoother penumbras, smaller sizes make sharper shadows and harsher penumbras.
  • Specular reflections do not fall off. They stay the same intensity regardless of distance. Lessening the reflectance of the surface, or making the apparent size of the light larger, is necessary to lessen the specular hotspot's intensity.
Link to google documents version.

Saturday, June 7, 2008

Sync-speed explained

Max sync speed. It's an important term, but it can seem hard to understand. It's the maximum speed at which your camera can take a photo and still get the flash to hit the entire sensor.

Here is an example image to help explain:


Most modern DSLRs have two shutter doors, a top and a bottom one. When you press the shutter button, the top one starts to raise, and then the bottom one starts to follow, till they both meet, closed, at the top. The speed you set your shutter will determine the time between when the top door starts moving and the bottom door follows (your camera make/model also can affect this).

Your max sync speed is essentially the setting at which the top door has reached the top of the sensor before the bottom door has started moving. It provides an entirely unobstructed view of the sensor for the flash to come in. A flash's duration is around 1/4000 or faster, so it will always be fast enough to hit the sensor for only a fraction of your shutter duration.

If you set your camera to faster than max sync speed, say 1/320 of a second, when your flash fires, the bottom door will already have started upward, and will be blocking a portion of the sensor from getting flash. This will cause a black bar at the bottom of the image. If you go too fast, say 1/1000, you will get a black bar from both the top door and bottom door. At this speed, the opening of the shutter is essentially a small slit moving across the sensor. The bottom door starts moving almost immediately after the top door starts. This will give you a black bar on top and bottom of the image.

Some point/shoot cameras, like the Canon g9, have electronic shutters, meaning that rather than using a physical door, the camera merely shuts off the sensor. This results in being able to sync around 1/4000. There is no door in the way of the flash.

Ambient is unaffected by this property. That's why most flash photographers start their camera at their max sync speed (1/200 or so), get the flash value correct, then start lowering the shutter speed to allow in more background light. I mentioned that the flash duration is only 1/4000 of a second or faster, so it will hit the sensor the same at 1/200 as it does at 1/5 of a second. Only ambient will be affected by this change in time.

When shooting with both flash and ambient, you get an opportunity to balance the flash intensity with background intensity.

For example:

agust_sunset-4

This shutter speed is 1/125. If I changed it to 1/200, the sky would be darker, and the sunlight on his right cheek would be a bit dimmer. If I changed the shutter speed to 1/60, the sky would be much brighter, and the sunlight on his cheek even brighter. The flash fill on the left of his face would be unaffected by the shutter speed change.

You can see how this gives you power to alter your light ratios, background to foreground values, and overall scene control.