Long time no post. I set my sites on a new camera, and my old one became a neglected orphan on the shelf till I got the new one. It was stupid, but I kept thinking of ideas and how I wanted to do them with the new camera, not the old. But, that time is past, I have the new camera and have been shooting a lot. Mostly non portraiture with no lighting, but if you are curious, check it out here. Low on commentary, big on photos.
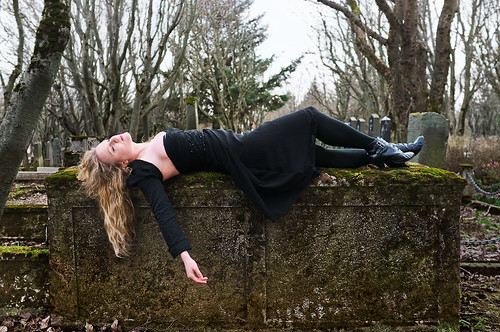
A friend of mine who I'd shot before, but never one on one, emailed me asking to do a shoot. I had a free Sunday and started thinking of ideas so I said yes. Immediately I thought of how I wanted to shoot in the cemetery near my house again. I had two images start to coalesce in my head. The first was in black, and something to do with mourning. I wasn't sure the pose, but in my head it seemed it would be standing and looking wistfully at a gravestone. We tried that early and it was so painfully cliche we moved on quickly. I saw this moss covered wall and knew it would work well.
For the lighting, it was a very overcast day. No flashes used. I wanted to find an area where we had a bit heavier tree coverage overhead, with a more open space further out. This would give some shadows in the front, and a rim-light type soft light coming from the background. This would also give a high-key background so the foreground could anchor with a bit more shadows.
I let the camera meter everything, which fit all the values in. Her skin is slightly over exposed, but I like the look it gives next to the dark dress. The post work was simple. I cloned out a small strap on the skin, removed a blueish cast from the dress and used curves to darken it a little. The wall she is laying on had the contrast bumped, it was sharpened an extra amount so her skin would look extra soft in contrast to it, and the green moss under the small of her back I bumped a little with a curve so it emphasized the line of her body. On her face I did a small amount of blemish removal, and evening of the makeup color around the forehead. Very little body touchup in comparison to many of my images. I also made a selection along the silhouette of her body, and darkened the background using an exposure layer, so that she would pop a bit more, light against dark.
After the first half of the shoot we walked back to my house to warm up, change outfits, and I wanted to get a wooden chair as a prop. I had envisioned something like this shot in mind, though her outfit was of her choosing, it fit what I wanted as a timeless sort of feel. I wanted a setting with a bit of framing. Something on both sides, and a branch at the top anchoring downwards, so I could go really wide while still having her stay the focal point. The focus was actually missed on this, it was far forward, but I loved what it did for her skin and hair, very glowy and soft. I used photoshop's lens blur function to hide this fact by blurring the front so it feels like the focus is where it should be.
For post work, I added an exposure layer that darkened and roughly outlined her hair, as the line between hair and glowy background wasn't as strong as it needed to be. I added a yellow layer set to screen, and adjusted it's clipping properties to only affect the lightest areas of the image, and masked it away from her body so it didn't affect the skin. This warmed the image slightly. I then did the same thing with a purple layer to cool the shadows so the image would have a balance.


Wow! I can't believe that the second photo taken on X100. My first thought was it is on 5D. :)
ReplyDeleteHah, well it doesn't quite have the out of focus the 35L has on a full frame, but I like it a lot anyway. IQ wise, it matches or exceeds the files from my 5D
ReplyDeleteThis comment has been removed by a blog administrator.
ReplyDelete