

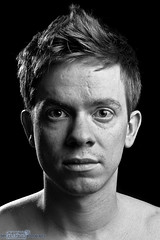
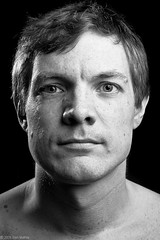
Settings:
2 Vivitar 285hv
Main set to full power,
through white shoot-through umbrella,
at middle zoom setting (this fills the umbrella with no spill)
Rim set to 1/4 power,
through Dave-Honl 1/8" grid-spot,
Full zoom setting
Main light stand was at 2 meters height, rim was at 2.5 meters
Main light was slightly in front of the subject, at 45 degrees, just outside of the frame
Rim was 2 meters behind subject, 1 meters to the left,
Rim light was aimed at his head, main light aimed directly at the right eye.
The goal was to reveal the volume of the skull, and the texture of the skin, while still being "soft" lighting. This means I needed what's called "rake light". You put the light at an angle to the detail, and it will be revealed more than with a more frontal light. The main white umbrella is shooting across the face, so it acts as a rake light. However it's so close and so large that it comes across as quite soft at the same time.
The rim light is so that the head does not get lost in the black shad0w of the background. Speaking of background, it's actually my dining room. There is no drop cloth, and it's quite light outdoors. The two lights are just so bright, and so close, that by adjusting my aperture and shutter speed for them allows the ambient to practically disappear. I have to do some slight burning to remove one or two light spots, but it's practically dark when I bring it in.
The post processing is a bit complex. I have a b&w preset that brings up the black point, adjusts curves to show maximum volume without clipping, and pushes contrast and clarity quite high. Then I jump to photoshop, make sure the background is solid black, do any physique fixes (sometimes I emphasize muscles or straighten posture or head angle), then use smart sharpen to really bring out the pores and texture. After it's saved and brought back into lightroom, I have a b&w final setting that mostly just ups clarity again to 100%.
I think this project has emphasized to me how good photo series/projects are. Whenever I'm lacking for other ideas, I can ask someone to sit for this series. It's also given me a larger body of work that is more identifiable than my other random attempts.
Here is the full set.
I'm at 10 now, but aiming for 50 before I do the first book print.
More examples:

No comments:
Post a Comment