
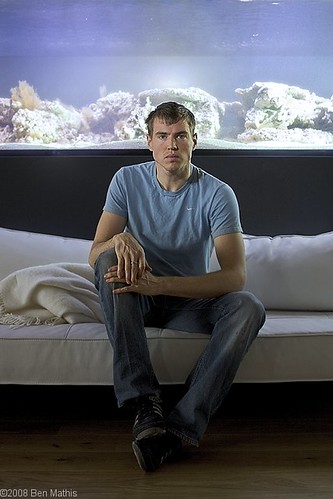
Settings: Ambient light is -3 stops below neutral grey. Green rim light is +1 stops, and Main fill is +1 stops. Rim light is from the right, through the fishtank, slightly behind the subject but aimed toward subject head. Fill is snooted and aimed directly at head, and is forward from subject and to the left (of camera).
This was a quick test over the weekend for a shoot I have coming up. I wanted to be more familiar with the setting, what works, and what doesn't. The main worry of mine, was that I wanted a flash coming through the fishtank to use as a rim light. It took some experimenting to get it to work. First I tried putting the flash on the opposite side of the tank pointing forward, but that created too much flare, and didn't give me the rim light I was looking for. Then I put the flash on the right side of the tank, and aimed it forward. This gave me the rim light that I needed. Now it was a matter of balancing ambient and the main flash.
On the above photo, the green light on the right side of my face is the rim light from the flash aimed through the tank. Even though the flash was at 1/1 power, and full 105mm zoom, I had to bump the ISO up to 400 and drop my aperture to f/3.5 in order to get that rim to the brightness I wanted. This was my hard point around which all other settings had to revolve, because this was the only option that worked.
Next, I figured out my ambient level by opening the shutter till it was where I wanted (I almost always start at 1/250 shutter when using flash) I wanted the ambient to remain dark, so it's about -3 stops from neutral grey. I had a few with it opened up more, but it was not enough contrast for my taste, and the fishtank started to blow out.
Now that I had my ambient balanced with the rim light, I needed my main light. I started with it at 1/128 and 105mm zoom, aimed directly at the head, but this was still too bright. The face where it hit was completely blown out. Since the 580ex doesn't go lower than 1/128, and I didn't have any ND filters with me, and the other settings were already anchored down, I only had one choice, and that was to start backing the light away from the subject. Every time the distance doubles, you get 1/2 the light. The more I backed it up, the more of the subject that would be lit, and I wanted it restricted to just the face. I popped on my grid-spot, to constrain the light to a tighter beam, and that did the trick. I got my main, ambient and rim all balanced in a way that worked.
After shooting, there was some cleanup. I had an unsightly shadow on the right from the snoot, and some junk in the fishtank that didn't add to the composition. This is where Photoshop comes in.

First, I boosted the shadows a bit. I could have gotten this by opening the shutter another 1/3 stop when I was shooting. Next, I cooled down the white balance of everything but the subject's skin. Then I removed the shadow on the couch and grey fishtank, and then cloned out the junk in the fishtank itself. Finally I used highpass and smart sharpen to bring a little extra medium and micro contrast to the face and hands.
Now I feel prepared to do a more elaborate shoot in this location based on this experiment. The majority of the problems have been solved, and I'll just have to concentrate on composition with a group and directing my subjects. If I'd left these technical aspects till the shoot itself, I would have either frustrated my subjects with all the back and forth, or I would have rushed myself and not gotten the result that I wanted.

No comments:
Post a Comment