
Finally got this video edited and uploaded. This is almost all information covered elsewhere, mostly at the strobist but I figured some would like it in video form. It's a bit long, 49 minutes, but it was for an in person class, and I needed to cover everything.
Monday, June 30, 2008
Wednesday, June 18, 2008
Graffiti photo shoot
A friend of mine, Oddur, and I decided to do a shoot out in the fading sun this weekend. This was taken around 8:00 with a fairly overcast sky, which had nothing interesting about the lighting. This was the beginning of the shoot against a nice graffiti-ed wall.
I liked how orange the graffiti was, and wanted to play up the warmth with my flashes. I'd scouted this location before, here, and had tucked it away in my mind as a good backdrop for portraits.
Settings:
2 Vivitar 285hv
Main set to full power with,
1/8 CTOrange gel,
through white shoot-through umbrella,
at middle zoom setting (this fills the umbrella with no spill)
Rim set to 1/4 power with,
1/2 Window Blue gel
Full zoom setting
Main light stand was at 2.5 meters height, rim was at 1 meters
Main light was slightly in front of the subject, 2 meters to the right
Rim was slightly behind subject, 3 meters to the left
Both were aimed directly at the subject
Here is the setup shot, click through to flickr for the notes over each flash and larger image:
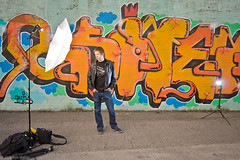
I started with the sync-speed at 1/200 to get my flash values correct, then lowered to 1/100 to let in more ambient light and brighten the graffiti-ed wall. The blue rim was to provide a bit of separation from an otherwise all warm scene. I kept the WB set to Flash, so that my very lightly colored gels would show through. At 1/8 orange, auto white balance would correct for it, making everything else very blue. This is useful at times, but not the look I wanted here, as my goal was to capitalize on the warm background. The flash values came together quickly, and I got the gels right the first time, so the only experimentation was figuring out the angles I wanted them at. I shot a few times, moving the umbrella closer and further forward to reveal more of his face. I also originally had the rim light set to rake across the background as well, but found I didn't like the look, and rotated so it was hitting only him. I wanted a very normal Field of View on this, so I used my 35mm lens, which is not only my sharpest lens, but turns into a very normal 56mm lens on my 40d camera.
Here is the final result:


Click through for the whole set
I liked how orange the graffiti was, and wanted to play up the warmth with my flashes. I'd scouted this location before, here, and had tucked it away in my mind as a good backdrop for portraits.
Settings:
2 Vivitar 285hv
Main set to full power with,
1/8 CTOrange gel,
through white shoot-through umbrella,
at middle zoom setting (this fills the umbrella with no spill)
Rim set to 1/4 power with,
1/2 Window Blue gel
Full zoom setting
Main light stand was at 2.5 meters height, rim was at 1 meters
Main light was slightly in front of the subject, 2 meters to the right
Rim was slightly behind subject, 3 meters to the left
Both were aimed directly at the subject
Here is the setup shot, click through to flickr for the notes over each flash and larger image:
I started with the sync-speed at 1/200 to get my flash values correct, then lowered to 1/100 to let in more ambient light and brighten the graffiti-ed wall. The blue rim was to provide a bit of separation from an otherwise all warm scene. I kept the WB set to Flash, so that my very lightly colored gels would show through. At 1/8 orange, auto white balance would correct for it, making everything else very blue. This is useful at times, but not the look I wanted here, as my goal was to capitalize on the warm background. The flash values came together quickly, and I got the gels right the first time, so the only experimentation was figuring out the angles I wanted them at. I shot a few times, moving the umbrella closer and further forward to reveal more of his face. I also originally had the rim light set to rake across the background as well, but found I didn't like the look, and rotated so it was hitting only him. I wanted a very normal Field of View on this, so I used my 35mm lens, which is not only my sharpest lens, but turns into a very normal 56mm lens on my 40d camera.
Here is the final result:
Click through for the whole set
Monday, June 9, 2008
Dual flashes in the fading sunlight
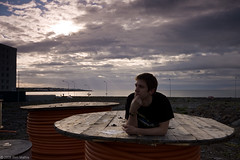
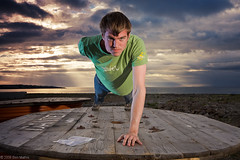
A friend of mine, Oddur, and I decided to do a shoot out in the fading sun this weekend. This was taken around 8:30 and the sun was still a ways off from setting, but the clouds gave us a really nice backdrop to work with. We started against a nice graffiti-ed wall, but I spotted a spool of electrical cable that I thought could make a neat stand against the sky.
Here is how the scene looks with no flashes:
I wanted the sun and sky to be in the background, but that is where the lightsource is, which means to light up my foreground subject, I need to use some flashes. I decided to use two, one for front fill, and one for rim light.
Settings:
2 Vivitar 285hv
Main set to full power with,
1/8 CTOrange gel
Rim set to 1/4 power with,
1/2 Window Blue gel
Full zoom setting on both
Main light stand was at 2.5 meters, rim was at 2 meters
Main light was even with camera, 3 meters to the right and 2 meters forward from model
Rim was even with subject, 3 meters to the left
Both were aimed directly at the subject
Here is the setup shot, click through to flickr for the notes over each flash and larger image:
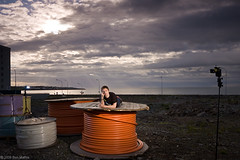
In order to control the sky brightness even more, I used a 8 stop Graduated Neutral density filter, tilted, to darken the sky in the upper left, but not reach the subject. I wanted a lot of sky, and to show the interesting wooden spool he was shooting on, which meant I needed my 10-20mm lens. These were shot mostly around 12-20mm to avoid too much distortion. I kept the shutter speed at 1/250 in order to bring the sky brightness down, and since the main flash was working at full power, I had to keep the aperture fairly wide at the lens maximum (which changes as you zoom, so it's between f/4 and f/5.6 for the set) in order to let in enough flash. If I'd moved the flash in closer, I could have stopped down the lens a bit. Luckily the lens is still fairly sharp wide open. My biggest regret is not having an assistant to hold the lightstand. it was quite windy and an umbrella would have blown my stand over. I can brace the bottom, but the wind was so strong it would have bent or snapped the lightstand. That's why both flashes are bare. If I'd had assistants I would have put a white shoot through umbrella on the main light, and a silver bounce umbrella on the rim light to increase the light size and soften it a bit.
Here is the final result:
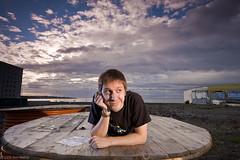
And since I was so excited about this setup, I switched places with Oddur and had him snap a few of me:
Click through for the whole set
Here is how the scene looks with no flashes:
I wanted the sun and sky to be in the background, but that is where the lightsource is, which means to light up my foreground subject, I need to use some flashes. I decided to use two, one for front fill, and one for rim light.
Settings:
2 Vivitar 285hv
Main set to full power with,
1/8 CTOrange gel
Rim set to 1/4 power with,
1/2 Window Blue gel
Full zoom setting on both
Main light stand was at 2.5 meters, rim was at 2 meters
Main light was even with camera, 3 meters to the right and 2 meters forward from model
Rim was even with subject, 3 meters to the left
Both were aimed directly at the subject
Here is the setup shot, click through to flickr for the notes over each flash and larger image:
In order to control the sky brightness even more, I used a 8 stop Graduated Neutral density filter, tilted, to darken the sky in the upper left, but not reach the subject. I wanted a lot of sky, and to show the interesting wooden spool he was shooting on, which meant I needed my 10-20mm lens. These were shot mostly around 12-20mm to avoid too much distortion. I kept the shutter speed at 1/250 in order to bring the sky brightness down, and since the main flash was working at full power, I had to keep the aperture fairly wide at the lens maximum (which changes as you zoom, so it's between f/4 and f/5.6 for the set) in order to let in enough flash. If I'd moved the flash in closer, I could have stopped down the lens a bit. Luckily the lens is still fairly sharp wide open. My biggest regret is not having an assistant to hold the lightstand. it was quite windy and an umbrella would have blown my stand over. I can brace the bottom, but the wind was so strong it would have bent or snapped the lightstand. That's why both flashes are bare. If I'd had assistants I would have put a white shoot through umbrella on the main light, and a silver bounce umbrella on the rim light to increase the light size and soften it a bit.
Here is the final result:
And since I was so excited about this setup, I switched places with Oddur and had him snap a few of me:
Click through for the whole set
Saturday, June 7, 2008
Sync-speed explained
Max sync speed. It's an important term, but it can seem hard to understand. It's the maximum speed at which your camera can take a photo and still get the flash to hit the entire sensor.
Here is an example image to help explain:

Most modern DSLRs have two shutter doors, a top and a bottom one. When you press the shutter button, the top one starts to raise, and then the bottom one starts to follow, till they both meet, closed, at the top. The speed you set your shutter will determine the time between when the top door starts moving and the bottom door follows (your camera make/model also can affect this).
Your max sync speed is essentially the setting at which the top door has reached the top of the sensor before the bottom door has started moving. It provides an entirely unobstructed view of the sensor for the flash to come in. A flash's duration is around 1/4000 or faster, so it will always be fast enough to hit the sensor for only a fraction of your shutter duration.
If you set your camera to faster than max sync speed, say 1/320 of a second, when your flash fires, the bottom door will already have started upward, and will be blocking a portion of the sensor from getting flash. This will cause a black bar at the bottom of the image. If you go too fast, say 1/1000, you will get a black bar from both the top door and bottom door. At this speed, the opening of the shutter is essentially a small slit moving across the sensor. The bottom door starts moving almost immediately after the top door starts. This will give you a black bar on top and bottom of the image.
Some point/shoot cameras, like the Canon g9, have electronic shutters, meaning that rather than using a physical door, the camera merely shuts off the sensor. This results in being able to sync around 1/4000. There is no door in the way of the flash.
Ambient is unaffected by this property. That's why most flash photographers start their camera at their max sync speed (1/200 or so), get the flash value correct, then start lowering the shutter speed to allow in more background light. I mentioned that the flash duration is only 1/4000 of a second or faster, so it will hit the sensor the same at 1/200 as it does at 1/5 of a second. Only ambient will be affected by this change in time.
When shooting with both flash and ambient, you get an opportunity to balance the flash intensity with background intensity.
For example:
This shutter speed is 1/125. If I changed it to 1/200, the sky would be darker, and the sunlight on his right cheek would be a bit dimmer. If I changed the shutter speed to 1/60, the sky would be much brighter, and the sunlight on his cheek even brighter. The flash fill on the left of his face would be unaffected by the shutter speed change.
You can see how this gives you power to alter your light ratios, background to foreground values, and overall scene control.
Here is an example image to help explain:
Most modern DSLRs have two shutter doors, a top and a bottom one. When you press the shutter button, the top one starts to raise, and then the bottom one starts to follow, till they both meet, closed, at the top. The speed you set your shutter will determine the time between when the top door starts moving and the bottom door follows (your camera make/model also can affect this).
Your max sync speed is essentially the setting at which the top door has reached the top of the sensor before the bottom door has started moving. It provides an entirely unobstructed view of the sensor for the flash to come in. A flash's duration is around 1/4000 or faster, so it will always be fast enough to hit the sensor for only a fraction of your shutter duration.
If you set your camera to faster than max sync speed, say 1/320 of a second, when your flash fires, the bottom door will already have started upward, and will be blocking a portion of the sensor from getting flash. This will cause a black bar at the bottom of the image. If you go too fast, say 1/1000, you will get a black bar from both the top door and bottom door. At this speed, the opening of the shutter is essentially a small slit moving across the sensor. The bottom door starts moving almost immediately after the top door starts. This will give you a black bar on top and bottom of the image.
Some point/shoot cameras, like the Canon g9, have electronic shutters, meaning that rather than using a physical door, the camera merely shuts off the sensor. This results in being able to sync around 1/4000. There is no door in the way of the flash.
Ambient is unaffected by this property. That's why most flash photographers start their camera at their max sync speed (1/200 or so), get the flash value correct, then start lowering the shutter speed to allow in more background light. I mentioned that the flash duration is only 1/4000 of a second or faster, so it will hit the sensor the same at 1/200 as it does at 1/5 of a second. Only ambient will be affected by this change in time.
When shooting with both flash and ambient, you get an opportunity to balance the flash intensity with background intensity.
For example:
This shutter speed is 1/125. If I changed it to 1/200, the sky would be darker, and the sunlight on his right cheek would be a bit dimmer. If I changed the shutter speed to 1/60, the sky would be much brighter, and the sunlight on his cheek even brighter. The flash fill on the left of his face would be unaffected by the shutter speed change.
You can see how this gives you power to alter your light ratios, background to foreground values, and overall scene control.
Friday, June 6, 2008
Blue rim light
I had an idea to use hard, bright rim lights for a portrait. I knew exactly what I wanted to do, so there was very little adjustments for this shoot.
Settings:
2 Vivitar 285hv
Both set to 1/2 power
3/4 Windows Blue gels
Full zoom setting
Light stands at 2 meter height
2 meters apart from one another
Aimed toward the photographer at a point one meter in front of them.
I put on my 50mm 1.8 lens, set it to 1/200 shutter speed, and f/5.6 at iso 100. I had Agust stand at the spot the flashes were aimed at (his head) and stood 2 meters in front of him. I focused on his eyes with the center AF point, and shot a few tests. I did not like how in focus the background was, so I lowered both flashes to 1/4 power, and moved my aperture down to f/2.5
Setup shot:

From behind:
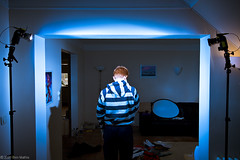
The white balance was set to flash, so that the blue of the gels would come through. I held a 60" white reflector in one hand, angled up to his face, so that the flashes would bounce off and "fill" his face with a bit of light.

Here is a before/after of the post settings in lightroom.
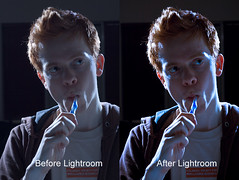
One thing I like about this, is that it shows how sharp and nice images can come from even the cheapest lenses, when the light quality is good, and your focus is dead on.
Settings:
2 Vivitar 285hv
Both set to 1/2 power
3/4 Windows Blue gels
Full zoom setting
Light stands at 2 meter height
2 meters apart from one another
Aimed toward the photographer at a point one meter in front of them.
I put on my 50mm 1.8 lens, set it to 1/200 shutter speed, and f/5.6 at iso 100. I had Agust stand at the spot the flashes were aimed at (his head) and stood 2 meters in front of him. I focused on his eyes with the center AF point, and shot a few tests. I did not like how in focus the background was, so I lowered both flashes to 1/4 power, and moved my aperture down to f/2.5
Setup shot:
From behind:
The white balance was set to flash, so that the blue of the gels would come through. I held a 60" white reflector in one hand, angled up to his face, so that the flashes would bounce off and "fill" his face with a bit of light.
Here is a before/after of the post settings in lightroom.
One thing I like about this, is that it shows how sharp and nice images can come from even the cheapest lenses, when the light quality is good, and your focus is dead on.
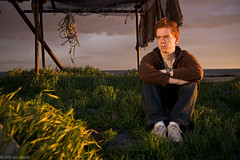
Agust in the sunset
Loving how the sun stays up till 11 PM here right now.
Last night I went rollerblading along the coast road in Seltjarnarnes (it's the tip of the peninsula that Reykjavik, our capital, is on) and the light and blowing grass was just breathtaking. I knew the lighting was just right for some photography. I raced home, told my roommate to get dressed and head out with me so I could photograph him and get some practice and possibly nice images. My bag was mostly packed, but I had to throw a few things in, unplug some things charging, and we hopped in the car.
When we parked and headed out, I saw that the blowing grass would be nice for a shot as well. I took a few sans flash just to experiment.
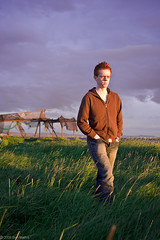
After those, I had him sit down near some small fishing net drying racks with tall grass around. This would give me lots of interesting foreground and background elements. I used a 28mm lens to get some wider angle full body stuff, while not having to be too far away.
Settings:
1 Vivitar 285hv
set to 1/32 power
3/4 CTOrange gel
Full zoom setting
Light stands at .5 meter height
3 meters to subject left, 2 meters in front of subject.
Aimed toward the subject, slightly up so not to spill on the ground.
I set my shutter speed to 1/200 and aperture to 3.2, with iso at 200. I set my vivitar 285hv to 1/8 power (it's been hacked to allow 12 full stops of power) at camera left about 1.5 meters to the left and 1.5 meters in front of the model, essentially at a 45 degree angle. A few test shots showed that with the gorgeous orange sunlight as rim, the plain flash appeared too blue. I popped on a 3/4 CTOrange, and angled the flash up a bit so it would feather his body and not touch the grass or ground. The flash was also too powerful so I knocked it down to 1/32 to give me a nice ratio between the rim light (sun) and the fill (CTOed flash) I opened the shutter up to 1/125 to let in a bit more background light as well.
Here are the resulting images.
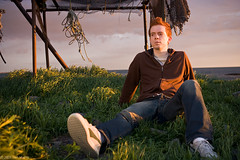
And a closeup, showing that since the cross lighting was in place, I could have my model move and rotate his head freely while maintaining good details and volumes.
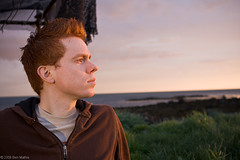
My only regret is that I wish I would have been more aware of the background net stand merging with his head, and have him move a bit to the right or left so that it was a bit separated.
Full set can be seen here: www.flickr.com/photos/mr_chompers/sets/72157605435360046/
Post processing was fairly basic. The sky was originally light blue. I used Lightroom's selective color editing to darken it a bit, shift it over to red for a slight purple hue, and saturate it a bit more heavily. I warmed the entire image's White Balance slightly, and then to counter that, I used the selective color editing to make the greens (which is the shadow area of the grass) to be bluer, and more saturated. This gives the illusion that all the light was warmer than it was in real life. A slight vignette to keep your eyes in the frame on top of the 28mm's natural slight vignette, and some small contrast, black point adjustment and clarity, with a bump in vibrance finished it off. I use the Lightroom/mogrify/flickr uploader to sharpen the final 1024x768 uploaded image so that it's not too soft with a radius of .2
Last night I went rollerblading along the coast road in Seltjarnarnes (it's the tip of the peninsula that Reykjavik, our capital, is on) and the light and blowing grass was just breathtaking. I knew the lighting was just right for some photography. I raced home, told my roommate to get dressed and head out with me so I could photograph him and get some practice and possibly nice images. My bag was mostly packed, but I had to throw a few things in, unplug some things charging, and we hopped in the car.
When we parked and headed out, I saw that the blowing grass would be nice for a shot as well. I took a few sans flash just to experiment.
After those, I had him sit down near some small fishing net drying racks with tall grass around. This would give me lots of interesting foreground and background elements. I used a 28mm lens to get some wider angle full body stuff, while not having to be too far away.
Settings:
1 Vivitar 285hv
set to 1/32 power
3/4 CTOrange gel
Full zoom setting
Light stands at .5 meter height
3 meters to subject left, 2 meters in front of subject.
Aimed toward the subject, slightly up so not to spill on the ground.
I set my shutter speed to 1/200 and aperture to 3.2, with iso at 200. I set my vivitar 285hv to 1/8 power (it's been hacked to allow 12 full stops of power) at camera left about 1.5 meters to the left and 1.5 meters in front of the model, essentially at a 45 degree angle. A few test shots showed that with the gorgeous orange sunlight as rim, the plain flash appeared too blue. I popped on a 3/4 CTOrange, and angled the flash up a bit so it would feather his body and not touch the grass or ground. The flash was also too powerful so I knocked it down to 1/32 to give me a nice ratio between the rim light (sun) and the fill (CTOed flash) I opened the shutter up to 1/125 to let in a bit more background light as well.
Here are the resulting images.
And a closeup, showing that since the cross lighting was in place, I could have my model move and rotate his head freely while maintaining good details and volumes.
My only regret is that I wish I would have been more aware of the background net stand merging with his head, and have him move a bit to the right or left so that it was a bit separated.
Full set can be seen here: www.flickr.com/photos/mr_chompers/sets/72157605435360046/
Post processing was fairly basic. The sky was originally light blue. I used Lightroom's selective color editing to darken it a bit, shift it over to red for a slight purple hue, and saturate it a bit more heavily. I warmed the entire image's White Balance slightly, and then to counter that, I used the selective color editing to make the greens (which is the shadow area of the grass) to be bluer, and more saturated. This gives the illusion that all the light was warmer than it was in real life. A slight vignette to keep your eyes in the frame on top of the 28mm's natural slight vignette, and some small contrast, black point adjustment and clarity, with a bump in vibrance finished it off. I use the Lightroom/mogrify/flickr uploader to sharpen the final 1024x768 uploaded image so that it's not too soft with a radius of .2
Gear
To serve as a reference, my lighting equipment is as follows:
(I've made them links to B&H so that you can see photos, read a more detailed description, or purchase the exact units. I get no kickback from this, it's purely for convenience)
Two Vivitar 285hv battery powered flashes
These are my main light sources. They are quite powerful and durable. They use 4x AA batteries. By default, they can zoom from 3 different settings, from wide to telephoto to throw the light wider or farther (useful for when you want to light a specific area) and can power down from 1/1, 1/2, 1/4, and 1/32 power with a dial. I have hacked one of mine to now go from 1/1 - 1/1024 in one stop increments. I used this page to figure out how to hack the light. It was quite easy. A few dollars in supplies and about one evening took care of it. I only hacked one, as I most of the time need my main light to be quite strong, so I use the unhacked for the main, and the hacked for the weaker secondary. If I only take one flash, I take the hacked version for more flexibility.
Manfrotto lightstand
Small, light, durable, aluminum, and fairly cheap. I have two of these. They are for putting the flashes on and holding at a certain height. In order to attach the flashes though, you need,
Umbrella swivel
This lets you attach the flash to the stand, insert an umbrella if you wish, and angle the flash up or down. You can also attach it sideways to angle the flash out from the stand.
Umbrella
Softens the light, or if you get silver, it will let you bounce it into it. It serves to modify the light, and make it softer.
Skyports
This is my wireless system for triggering the flashes. It allows you to place a small, matchbox-sized black box on your camera hotshoe, and then small units on your flashes, and when you take a photo, it will trigger the flashes. This allows you to be very mobile, with no cables, and also to be quite far away. I highly suggest going wireless, but this is the priciest part of the kit. For every new flash you add, you need this kit to trigger it as well.
Skyport to 285hv custom cable
Skyports will NOT fire the new 285hvs without this special cable. It has circuitry inside it of some type so that the two will talk to one another. I chose skyports and the 285hvs because they are the least expensive, but reliable, way into off camera wireless flash. These cables are a small caveat to this combination. The nice thing is that they can now be plugged directly into the flash with a single cable.
Rosco gels
These are for coloring your flashes to either compensate for existing lights that have a color cast (flourescent, tungsten, sodium vapor, candle, etc) or to color your light so it doesn't look neutral. These can be added to your B&H order for 1 penny, but if you find any nearby theatre lighting shops, they will most likely have these, and you can offer to buy one, they'll most likely give it to you. I had to build the edges of mine up with electrical tape so they will slide into the vivitar 285 slot.
Maxpedition sling pack
I love this bag. It's not a camera bag, so it doesn't scream to thieves to steal it. I have to keep my lenses in lens pouches to make it more padded, though the bottom is padded, just not the sides. The reason it's so nice, is that it has compression straps on the bottom, which hold a lightstand and umbrella just great. Since it holds them on the outside, it adds no bulk to the bag itself, so when I am not carrying the lightstand/umbrellas, I can travel with a lighter bag that's still small. It has a ton of pouches for various stuff, and the straps on the outside let me attach my lens pouches stably so that I can have more room inside of the bag. I can carry both flashes, three lenses, the camera body, both lightstands and umbrellas, plus my skyports, gels, extra batteries, etc, all in this bag. I like that it's a sling bag, because I can rotate it around without taking it off, very convenient for a prime lens user like me, where I have to change lenses often.
All of this information is explained very well at the strobist website. I'm only collating an easy to use list to purchase, and explain what I'm using in a quick post. Almost all of my knowledge started with the strobist site, and grew from experimentation and practice.
Subscribe to:
Posts (Atom)
